Jira Server and Data Center Integration Guide
Jira is a popular platform for agile work management and issue tracking. When incidents cannot be resolved permanently and immediately, it is important to work on it as a project with team members. TaskCall's Jira integration helps you achieve that precisely by allowing automated syncing between Jira issues and TaskCall incidents. Set aside project tasks and give it more context by creating Jira issues with a click of a button from within TaskCall. While you focus on resolving the incident, we will take care of preparing the issue for you in Jira. Get a head start when time matters the most.
Jira's services can be availed through its cloud platform, but organizations can choose to host their own Jira servers on premise. These are offered through different licenses under Jira Server (fully hosted by client) and Jira Data Center (hosted by Jira for the client in a separate environment). Although Jira Server will be taken out of service by 2024 as per the company website, Jira Data Center services will still continue. Follow this guide to set up your Jira Server or Jira Data Center integration. If you are using the Jira Cloud platform, then refer to our Jira Cloud Integration Guide.
Pointers
- The integration is between a TaskCall service and a Jira project.
- Issues can be manually or automatically created in Jira from TaskCall.
- If you choose to create the issues manually, then a custom button will be added to your Incident details page for that.
- Jira issue status, priority and comments are automatically synced up with TaskCall.
- The entire integration process is handled by TaskCall.
- All the integration steps will have to be performed at one go. Otherwise, you will have to start over again.
In TaskCall
- Go to Configurations > Services. Select the service you want to integrate with.
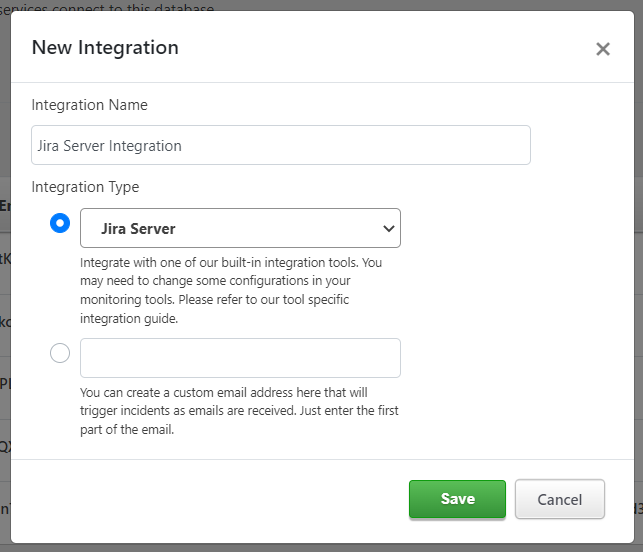
- Once you are on the Service details page, go to the Integrations tab. Click on New Integration.
- Give the integration a name.
- From the integration types, select the top radio button indicating that you are trying to use a built-in integration.
- From the list of built-in integrations, select Jira Server.
- Click Save.
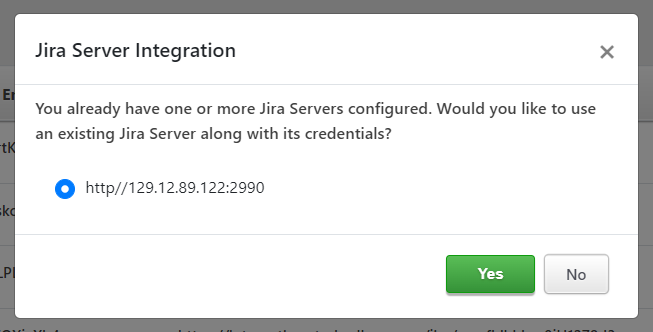
- You will then be prompted to choose or provide your Jira Server details. If you already have one or more Jira Server integrations in place, then you will have the option to choose one of the existing servers to do this integration with. This way you will not need to provide the same information multiple times.
- If you decide to do the integration with an existing server, then TaskCall will use that server address and credentials for this integration as well. You will be taken to the final step to configure the integration.
- If you do not have any existing Jira Server integration or you chose not to use the server details of an existing integration, then you will be prompted to enter the details of your Jira Server.
- Here you must provide the server address, the username of a user with administrative rights on your Jira Server and the user's password. The server address must be the full accessible path. For example, if your Jira Server home page is only accesible from the address http://187.78.45.99:2990/jira, then you must address the server address as such. The username and password are needed to make api calls to your server alone to create issues and sync them up with TaskCall incidents. These credentials will not be displayed to you again or be accessible by you. They are stored securely by TaskCall and only used for making the api calls strictly for the purpose of syncing issues and incidents.
- Click Next once you are done. You will be taken to the final step for configuring the integration.
- Configure how issues will be created in Jira from TaskCall:
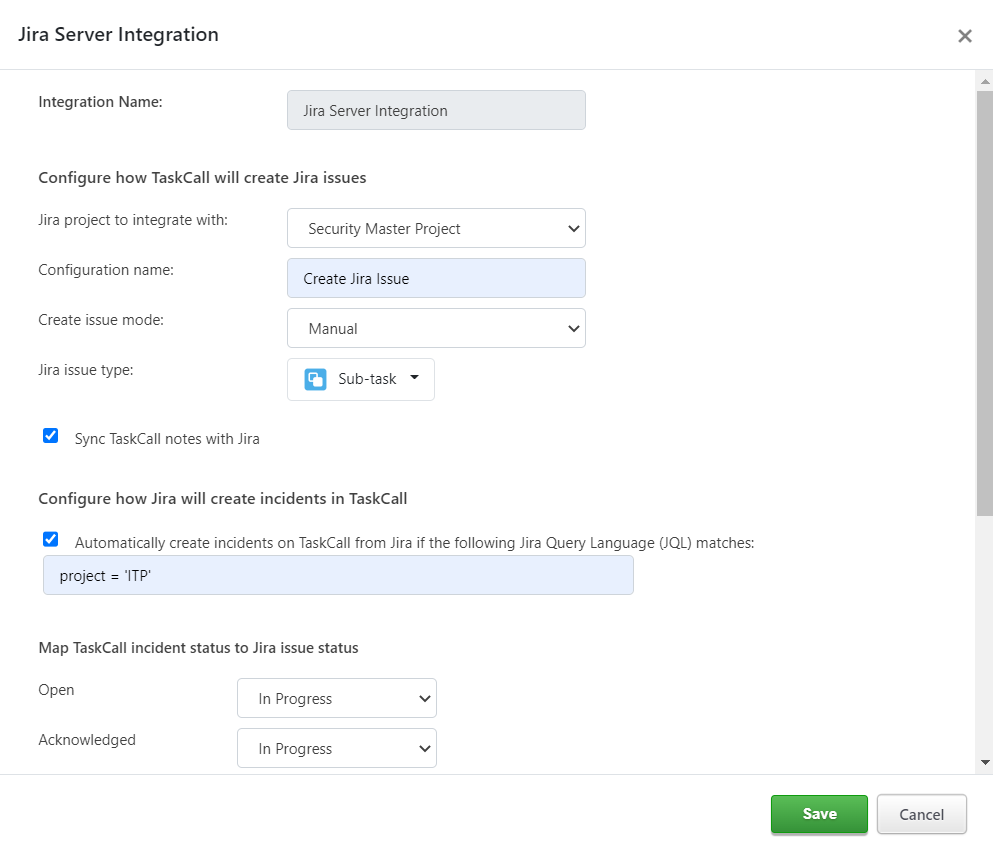
- Select the project that you want to integrate with.
- Give a configuration name (e.g. Create Jira Issue). This is the name that will be shown on the custom button that will be displayed for you on the Incident details page if you choose to create the issues manually. This button will be displayed in the dropdown More in the incident actions button panel on the page.
- Select whether you want to create the Jira issues manually or automatically. If you choose to create it manually, then you will be able to do so from the custom button that will be displayed for you on the Incident details page as mentioned above. The button will only be displayed for incidents that are triggered on the integrated service.
If you choose to create the issues automatically, then whenever an incident occurs on this service an issue will be created in Jira as per the configurations. - Choose the type of issue that will be created in Jira by this integration.
- Next, tick the checkbox if you want TaskCall notes to be synced with Jira comments. (Notes added to the incident will appear on the Jira project. However, comments made on the Jira project are not added as notes in TaskCall.)
- Configure how incidents will be created in TaskCall from Jira issues:
- TaskCall incidents can be automatically triggered whenever a Jira issue is created. To configure that check the box that says Automatically create incidents on TaskCall from Jira if the following Jira Query Language (JQL) matches and enter a valid JQL in the text box below it. JQL is a Jira specific query language that will allow you to filter down to the category of issues that you want to create incidents on.
- Map statuses and priorities between TaskCall and Jira so they can be synced up (only changes made in TaskCall are reflected in Jira, but Jira changes are not reflected in TaskCall):
- Set up how Jira statuses will be mapped to TaskCall.
- Set up how Jira priorities will be mapped to TaskCall urgency levels.
- When you are done, click Save.
- That's it. You are all set up to mobilize your development workflow even more.

How to manually create Jira issue?
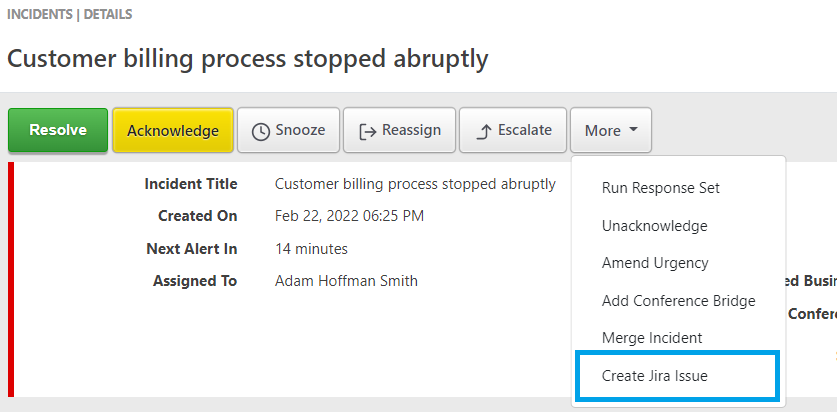
When you configure the integration to create Jira issues manually, TaskCall displays a custom button for you on the incident details page of incidents that occur on the integrated service. The button is shown in the dropdown options of the More button towards the top of the page. By clicking this button, you will be able to create an issue in Jira.
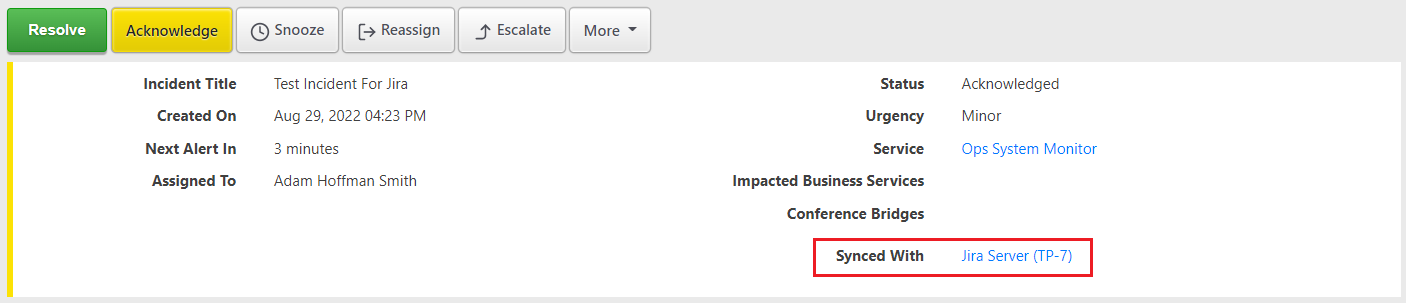
Where to find the synced issue?
Once a TaskCall incident is synced with a Jira issue, the issue key is displayed on the upper panel on the incident details page next to the Synced with label.