
Zendesk Integration Guide
Zendesk is a popular customer support and ticket management system. Zendesk makes ticket management seamless, but failure to respond to urgent issues fast can give rise to customer dissatisfaction and potential loss of revenue. TaskCall's Zendesk integration addresses that very problem by streamlining communication between the customer support teams and IT and Dev-Ops teams so that important issues are prioritized and responded to in the fastest possible time.
TaskCall's Zendesk integration provides a feature rich console in Zendesk that allows customer support agents the ability to mobilize incident resolutions. Agents are able to track incidents and understand their business impact without having to ping IT or Dev-Ops engineers. They can create incidents themselves and orchestrate an accelerated response without ever having to leave Zendesk. As agents get context to the technicality behind customer complaints, customer service only becomes more meaningful and efficient.
Pricing Plans
TaskCall's Zendesk integration is only available for the Business and Digital Operations pricing plans.
Pointers
- The application enables user specific access to TaskCall from within Zendesk.
- Incidents can be created in TaskCall from Zendesk manually/automatically.
- Tickets can be created in Zendesk from TaskCall manually/automatically.
- Tickets and incidents will sync up automatically.
- Multiple services can be integrated to the same Zendesk account. It gives you the flexibility to dictate how tickets will be created in Zendesk from TaskCall if you choose to do so.
- No personal information such as email address is needed for this integration. It is extremely secure and dynamic.
Features
TaskCall's Zendesk App is designed to significantly improve the speed and quality of customer service. It is a feature rich application that gives customer support teams the capability to direct and catalyze the response effort and draw in other arms of your company if needed.
- Automatically trigger incidents in TaskCall from Zendesk tickets based on custom conditions.
- Manually create incidents on any service in TaskCall from the Zendesk app console.
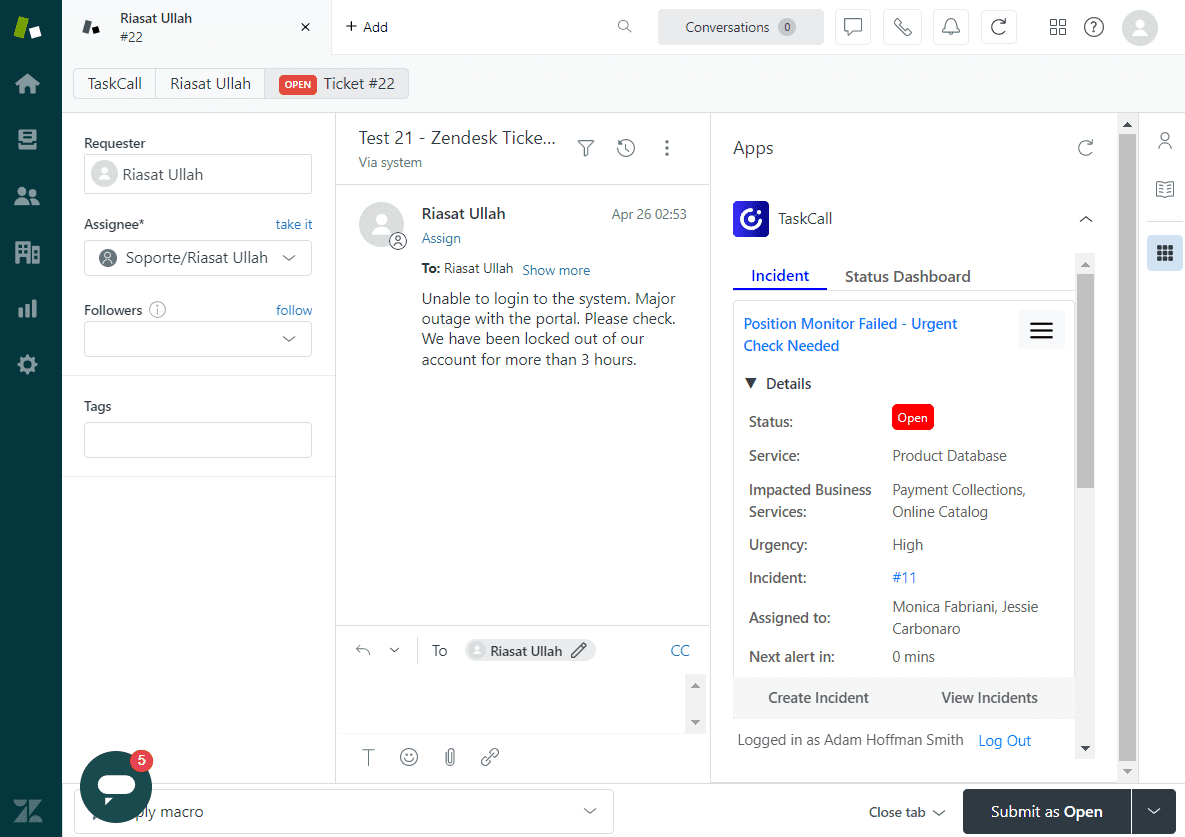
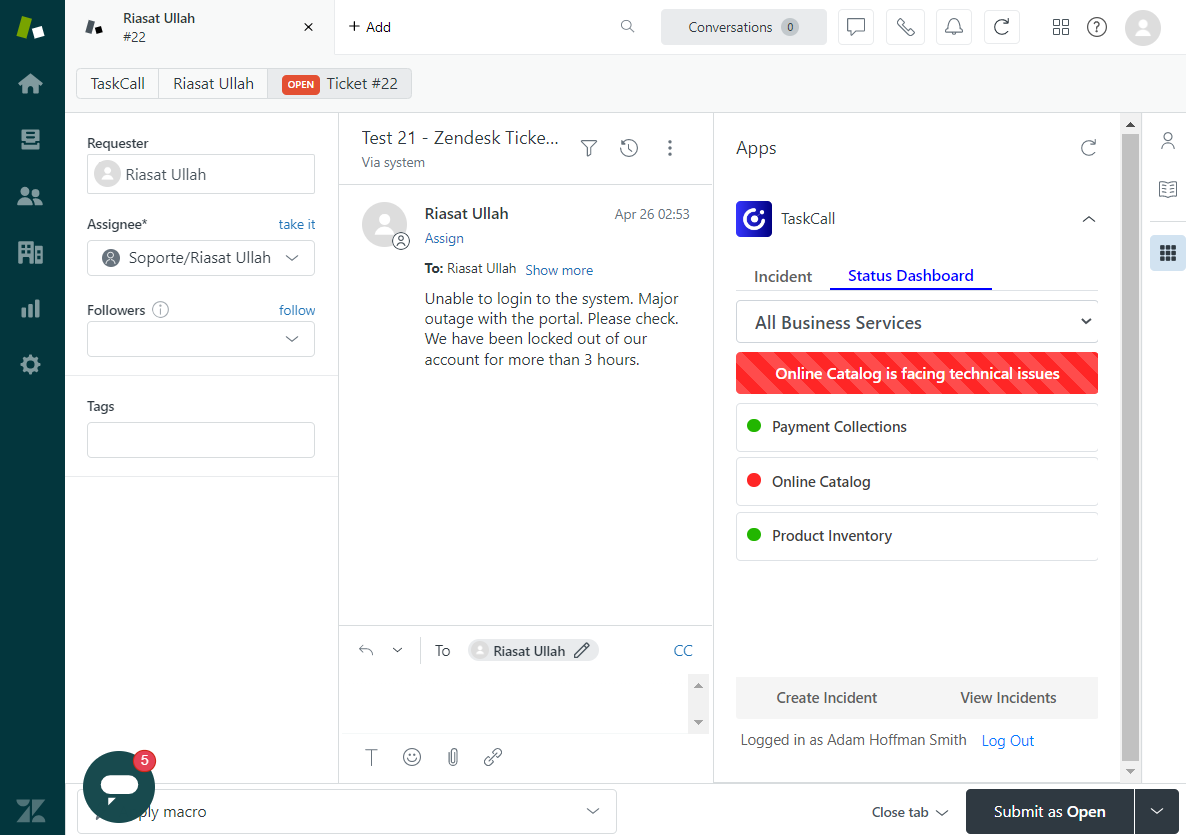
- Get access to TaskCall status dashboards in Zendesk and understand what business services are being impacted.
- Give customer support agents the ability to subscribe to incident notifications so they can always stay in on the loop.
- Take actions on incidents from Zendesk by acknowledging, resolving, bringing in new responders, adding notes, posting status updates and more. Incidents will automatically sync up between the two platforms.
- Get insights into other incidents occurring across your organization.
- Create Zendesk ticket from TaskCall manually or automatically (if certain conditions are met).
Setting up the integration requires some configuration on both platforms. Please follow through with the guidelines here to complete the process.
In Zendesk - Install TaskCall App
- Go the Zendesk Marketplace.
- Search for TaskCall and from the application details screen click Install.
- In the modal that is shown select the Zendesk account you want to install the application in and click Install again.
- In the final step, you will be required to specify the region your TaskCall account is hosted in. TaskCall has two hosting regions – EU and US. Enter your data center region in the Region field. If your data center hosting region is EU, then enter EU. If it is US, then enter US. It must be entered in all caps. The application will not function correctly if the wrong value is entered here.
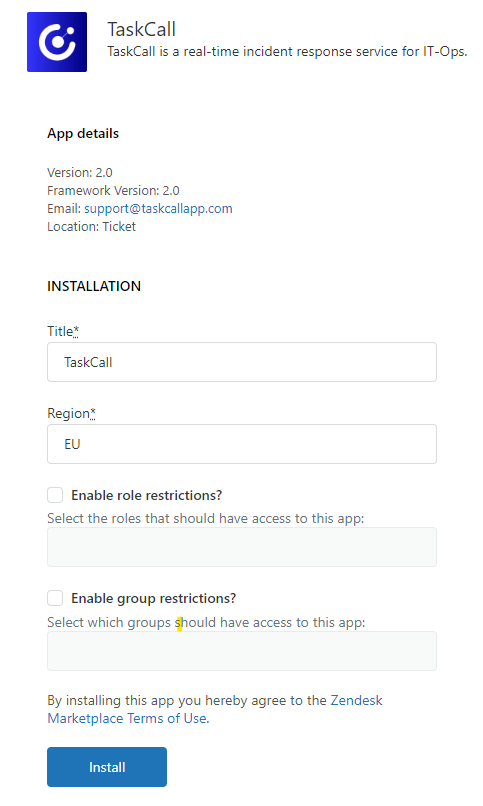
- Click Install.
- The application allows you to interact with TaskCall from Zendesk and handle incidents. However, you are yet to authorize the installation and define how the interaction will happen from TaskCall to create tickets. Thus, move on to TaskCall to set up the integration.
In TaskCall – Connect with Service and Authorize Installation
- In TaskCall you will set up the integration. You will configure how tickets will be created in Zendesk from TaskCall and how they will be synced up with incidents.
- Go to Configurations > Services . Select the service you want to integrate with.
- Once you are on the Service details page, go to the Integrations tab. Click on New Integration.
- Give the integration a name.
- From the integration types, select the top radio button indicating that you are trying to use a built-in integration.
- From the list of built-in integrations, select Zendesk.
- Click Save.
- Another modal will be displayed where you will be required to set up your integration configurations. Please note that the integration has not completed yet at this stage. Do not click out of the modal. Otherwise you will have to start all over again.

- Configure how tickets will be created in Zendesk from TaskCall:
- Enter your Zendesk account subdomain.
- Give a configuration name (e.g. Create Zendesk Ticket). This is the name that will be shown on the custom button that will be displayed for you on the Incident details page if you choose to create the tickets manually. This button will be displayed in the dropdown More in the incident actions button panel on the page.
- Select the type of ticket to create in Zendesk.
- Select whether you want to create Zendesk tickets manually or automatically. If you choose to create it manually, then you will be able to do so from the custom button that will be displayed for you on the Incident details page as mentioned above. The button will only be displayed for incidents that are triggered on the integrated service.
If you choose to create tickets automatically, then whenever an incident occurs on this service a Zendesk ticket will be created if the urgency of the incident is at least equivalent to the minimum urgency set in the configuration. - Choose whether you would like TaskCall notes, statuses and urgency levels to be synced up with Zendesk. If you decide to sync, you will also have to select how TaskCall statuses and urgency levels will be mapped to Zendesk statuses and priorities respectively.
- Click Save when you are done.
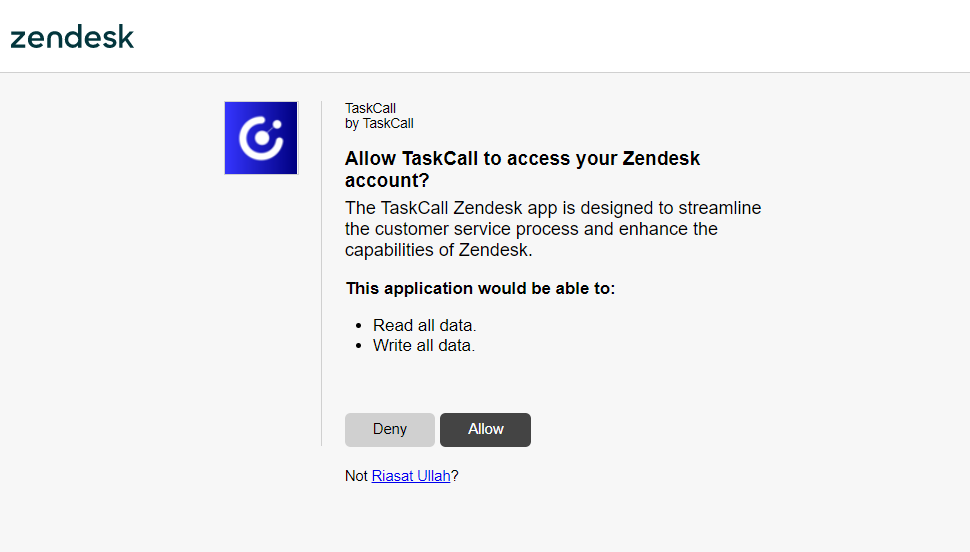
- You will be redirected to Zendesk to confirm that you permit TaskCall to interact with your Zendesk account. Click Allow.
- You will be directed back to TaskCall.
- Done! You have successfully integrated TaskCall with your Zendesk account.
Set-up Automatic Triggers from Zendesk to TaskCall
If an urgent customer support request is raised that heavily impacts your system, then you will want to act on it immediately. Delay in the initial response from customer support agents can be costly. You may want to set up a mechanism to automatically create incidents in TaskCall to ensure important issues are not missed. In such cases, follow the guideline below to set up automatic incident creation.
- In order to set up the automated triggers we will first need the webhook endpoint that was issued by TaskCall when you set up the integration. Hence, start by going to your TaskCall account.
- Go to Configurations > Services. Select the service you want to integrate with.
- Go to the Integrations tab. Find the Zendesk integration you had created. You will see an Integration Url has been issued for you.
- Copy the Integration Url.
- Now go back to Zendesk.
- We will create a webhook endpoint followed by trigger rules.
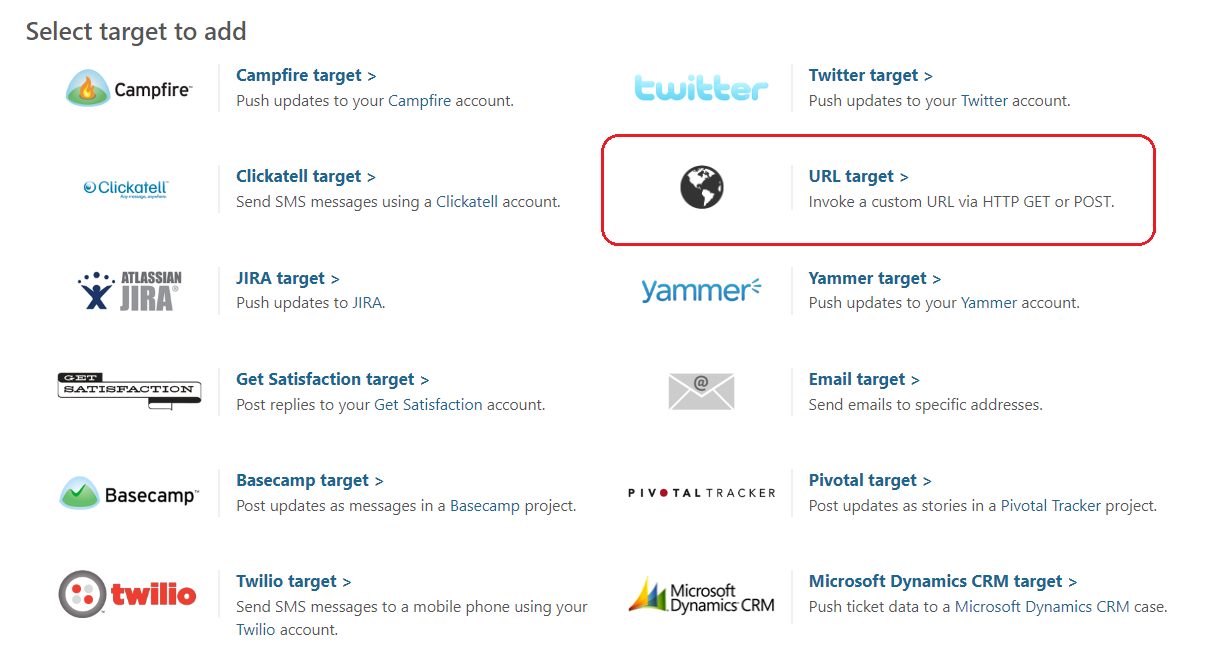
- Go to the Admin Center. On the navigation panel, scroll down to Apps and integrations > Targets.
- On the top right corner, click add target.
- From the list of target types shown, select URL target.
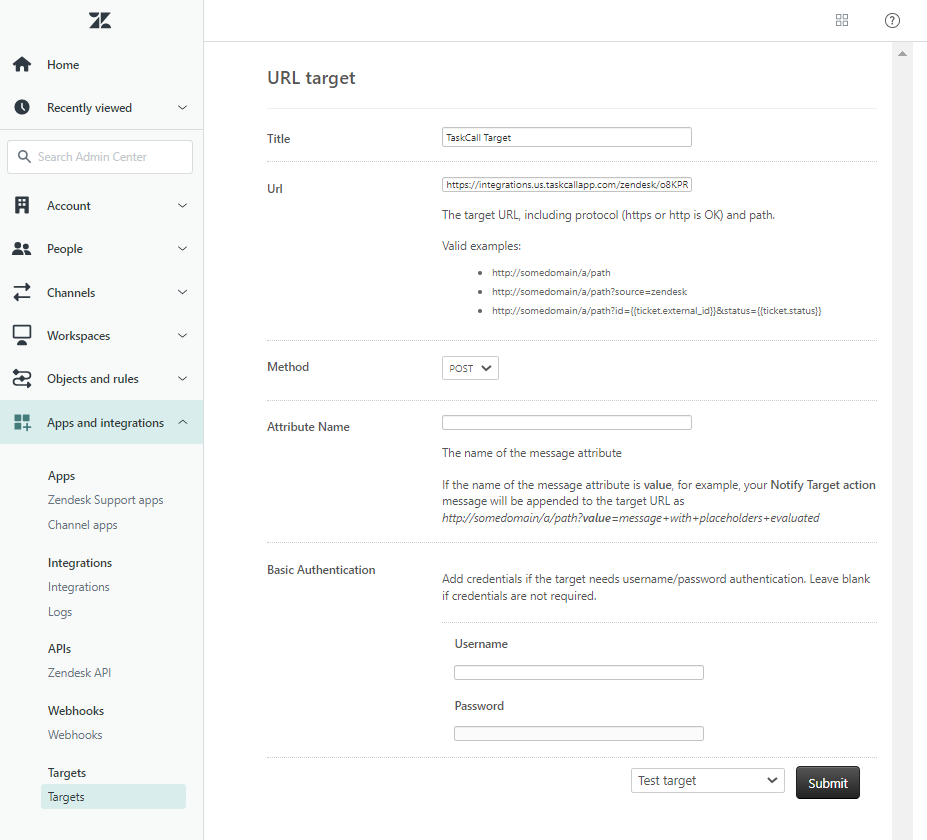
- Give it a title and paste the Integration Url you copied over from TaskCall in the Url field. Set the Method to be POST. Then click Submit.
- Now, from the navigation panel on the left, go to Objects and rules > Business Rules > Triggers.
- Click Add trigger on the top right corner.
- Give the trigger a name, a description and set the category as Notifications.
- Set the conditions of the trigger as per your need. We would recommend you set the conditions as when Ticket Is Created and Priority Is Urgent.
- Set the action by selecting the Notify target action type and choosing the TaskCall Target you created earlier. Then copy and paste the following JSON payload in the JSON body section:
{
"ticket_timestamp": "{{ticket.createdAt}}",
"ticket_id": "{{ticket.id}}",
"title": "{{ticket.title}}",
"channel": "{{ticket.via}}",
"priority": "{{ticket.priority}}",
"requester_name": "{{ticket.requester.name}}",
"status": "{{ticket.status}}",
"description": "{{ticket.description}}",
"link": "{{ticket.link}}"
}
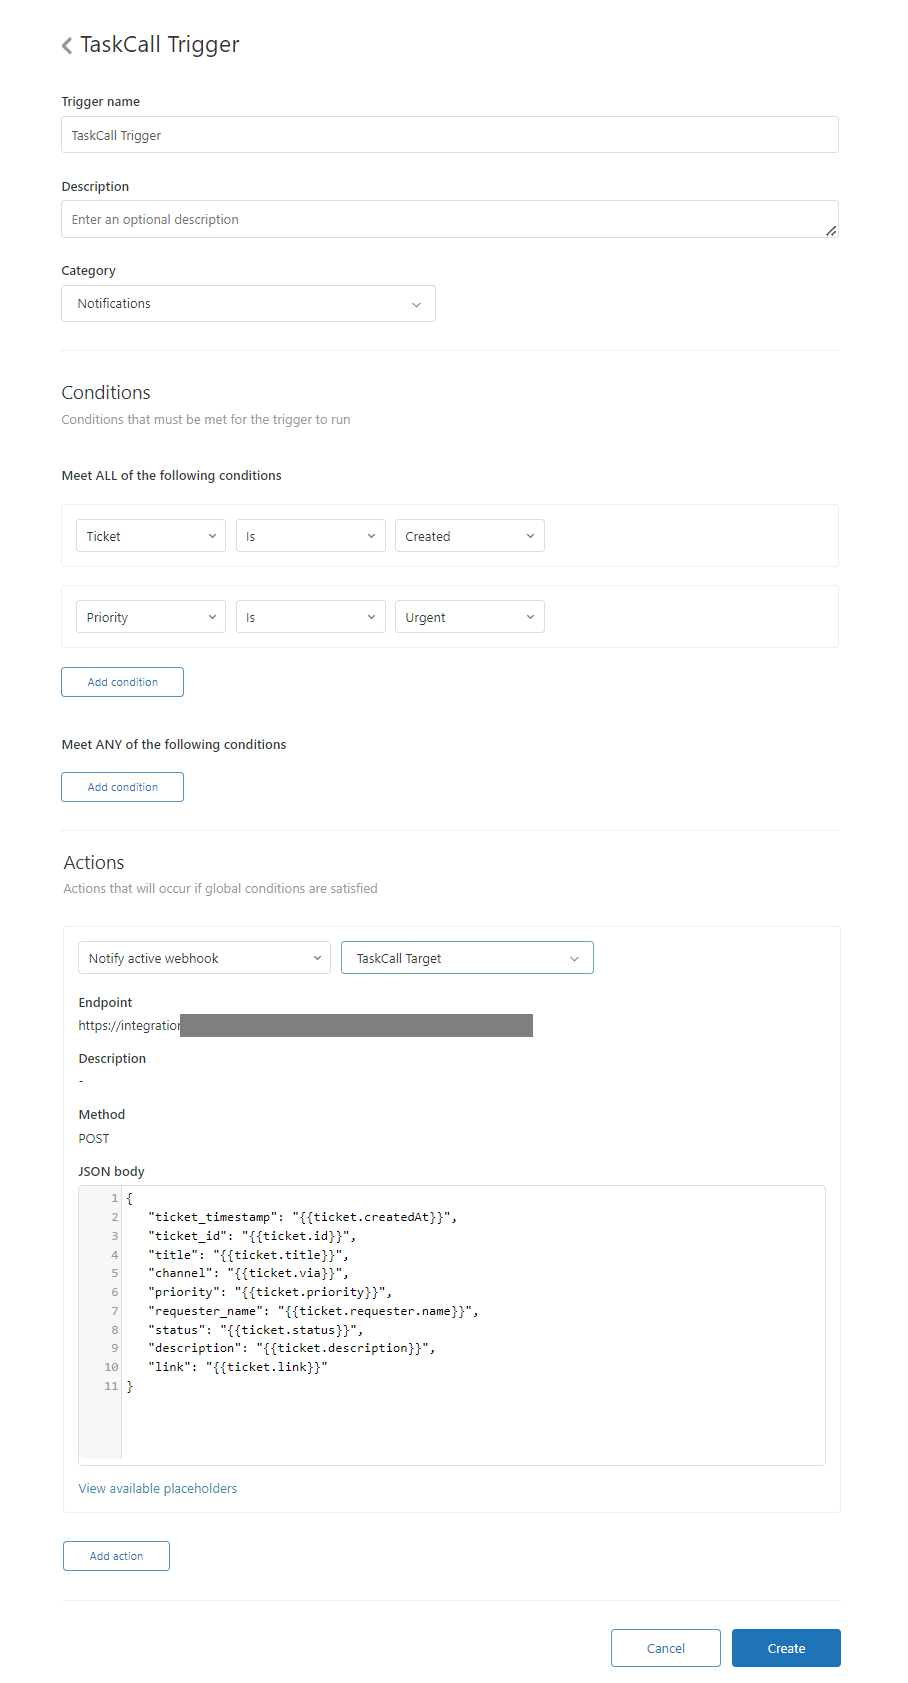
- Click Create.
- All done! Now incidents will be automatically created in TaskCall based on the conditions you have set for the trigger.
Logging into TaskCall Zendesk App
The TaskCall Zendesk App is extremely powerful. It lets each user login as themselves and allows the interaction to leverage on TaskCall permissions to control access levels.

- Once you click on the Log In button that is displayed on the app console, you will be directed to TaskCall to authorize the login.
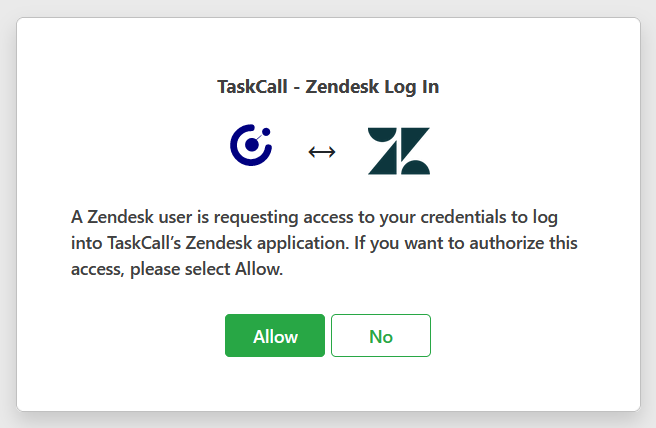
- Click Allow. You will be redirected to Zendesk and will be able to access the TaskCall application.
- If you are still being shown the login screen, then it is because your browser is blocking third party cookies. TaskCal sets a third party cookie on your Zendesk site to allow you to access the TaskCall application. Once you enable third party cookies, the application should work fine.
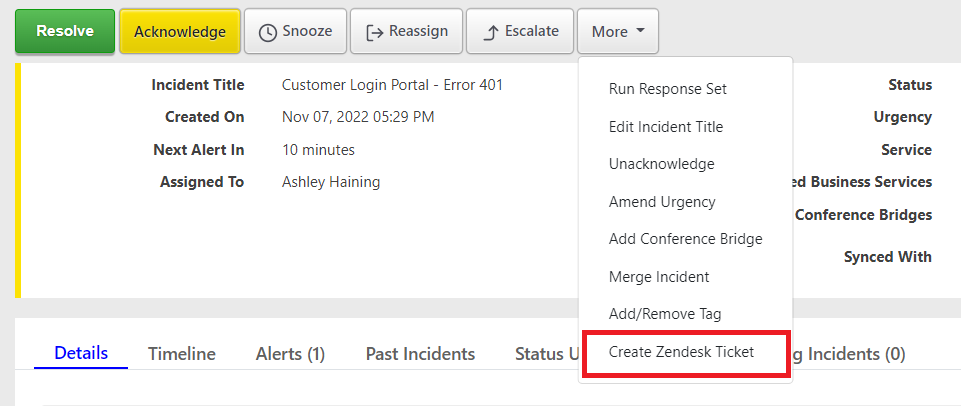
How to manually create Zendesk ticket?
When you configure the integration to create Zendesk tickets manually, TaskCall displays a custom button for you on the incident details page of incidents that occur on the integrated service. The button is shown in the dropdown options of the More button towards the top of the page. By clicking this button, you will be able to create a ticket in Zendesk.
Where to find the synced tickets?
Once a TaskCall incident is synced with a Zendesk ticket, the ticket ID is displayed on the upper panel on the incident details page next to the Synced with label.

TaskCall-Zendesk Integration Workflow
TaskCall's Zendesk App is intended to streamline the customer service process. Here is an example of an ideal workflow with the integration.
- A customer raises an urgent ticket for not being able to login to the customer portal.
- Since it is the weekend, the customer service representative was unlikely to notice the ticket, but thanks to the TaskCall webhook trigger that was setup, he gets notified immediately through emails, push notifications, SMS, voice calls and chat-ops integrations. It is a little difficult to miss persistent notifications from all these channels!
- He acknowledges the incident and lets the customer know that her issue is being attended to and adds the IT-Ops teams as responders on the incident.
- While the IT-Ops team is being notified by TaskCall and are coming on-board, he adds in a note for them to give them more context for the issue.
- He also posts an update on the status dashboard to keep all the stakeholders updated on the matter.
- All this is happening right from Zendesk using the TaskCall app.
- Once the IT-Ops team is done fixing the error, they resolve the incident.
- The customer support representative can then let the customer know that the issue has been fixed and subsequently resolve the ticket.
- The customer stays happy with the fast response and business downtime is reduced to the minimum.