
ServiceNow Integration Guide
ServiceNow is one of the most popular ITSM tools. It makes it easy for teams to manage their workflows. TaskCall integrates with ServiceNow to improve the discovery of assignments, fasten the response process and enable more efficient collaboration with other teams.
The integration supports two different workflows:
- Initiated in ServiceNow: An incident will be automatically created in TaskCall as soon as a ticket is raised in ServiceNow (can also be created manually). This allows your on-call responders to be assembled in real-time utilizing TaskCall’s powerful on-call management and notification system.
- Initiated in TaskCall:After an incident occurs in TaskCall, responders can manually create an incident in ServiceNow through a custom button issued with the integration.
In both workflows, actions taken on one platform will sync up on the other. Currently the following actions are supported: triggering an incident, acknowledging, adding responders, adding conference bridges, reassigning, resolving, running response sets and posting status updates.
Benefits
- Enable faster resolutions by coupling ServiceNow with TaskCall’s on-call management, notifications and incident response system.
- Take actions on TaskCall without leaving the ServiceNow platform. Mobilize response by running response sets, adding new responders and keeping stakeholders informed by posting status updates.
- Map assignment groups with services and escalation policies for effective incident delegation.
- Sync up notes between the two platforms to improve cross team collaboration.
- Automatically create incidents in TaskCall.
- Create incidents in ServiceNow from TaskCall through a custom button.
Pointers
- The integration is between a TaskCall service and a ServiceNow instance. Although the integration is set on single service, it is available account wide in TaskCall.
- The integration is bi-directional. Incident related information is exchanged between the two platforms to make work management easier.
- The integration requires configuration in both TaskCall and ServiceNow.
- The integration can only be completed by a user with Admin rights in TaskCall.
- Users are mapped automatically by their email. They can only be mapped correctly if the same email is used on their account on both platforms.
Pricing Plans
TaskCall's ServiceNow integration is only available for the Business and Digital Operations pricing plans.
ServiceNow Integration Process
The integration utilizes certain information from both platforms. TaskCall communicates with ServiceNow through a REST API. The API calls require user authentication whose details have to be obtained from ServiceNow. Once the integration is created, TaskCall will issue an integration URL that will be needed to configure the TaskCall application in ServiceNow. Hence, you will need to switch between the platforms twice.
Step 1: Create TaskCall User in ServiceNow
We will initiate the integration process in ServiceNow. You need to create a dedicated user whose credentials will be used to make the REST API calls from TaskCall.
In ServiceNow:
- Go to Organization > Users. Click New.
- Give the user a name (preferably taskcall so you can easily identify it), first name and last name. Ensure the Active, Web services access only and Internal Integration User checkboxes are all checked.
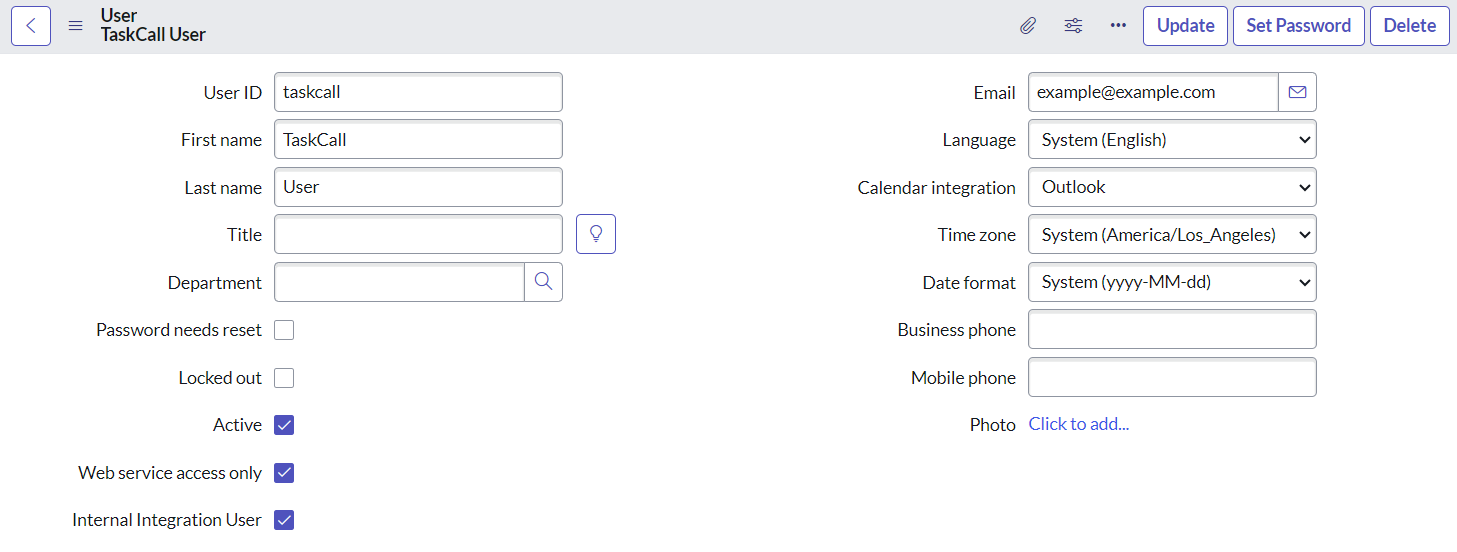
- Click Submit once you are done.
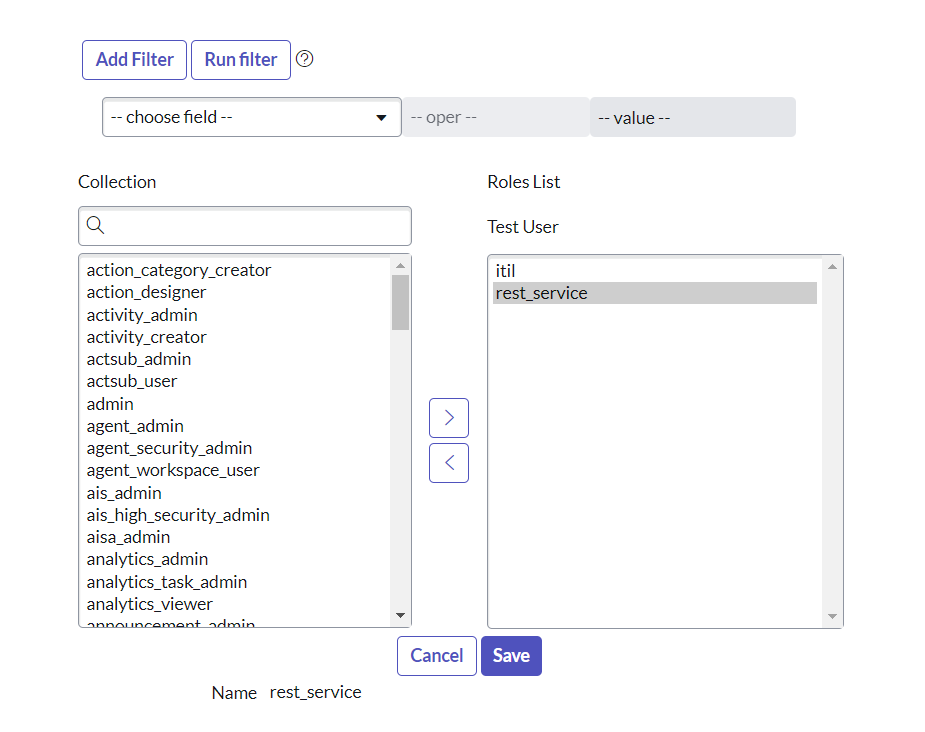
- Once the user is created, set a password for the user.
- Give the user basic user roles, but make sure that the itil and rest_service roles are at least provided. These two roles will allow the TaskCall integration to access the REST API and function correctly.
Pricing Plans
TaskCall's ServiceNow integration is only available for the Business and Digital Operations pricing plans.
Step 2: Configure Integration in TaskCall
We will set up the core of the integration now. Move to TaskCall. You will set up the ServiceNow integration on a TaskCall service. Although the integration will be created on a service, it will be available account wide.
- Go to Configurations > Services. Select the service you want to set up the integration on.
- Once you are on the service details page, go to the Integrations tab and click New Integration.
- Give the integration a name.
- From the integration types, select the top radio button indicating that you are trying to use a built-in integration.
- From the list of built-in integrations, select ServiceNow.
- Click Save.
- In the modal that is shown next, enter your ServiceNow instance URL (e.g. https://example.service-now.com), username and password of the user you created in ServiceNow earlier.
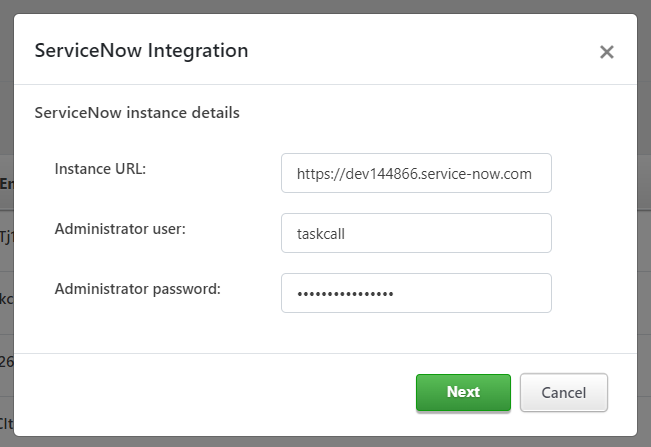
- Click Next.
- A new modal will be shown where you will configure how the integration will perform.
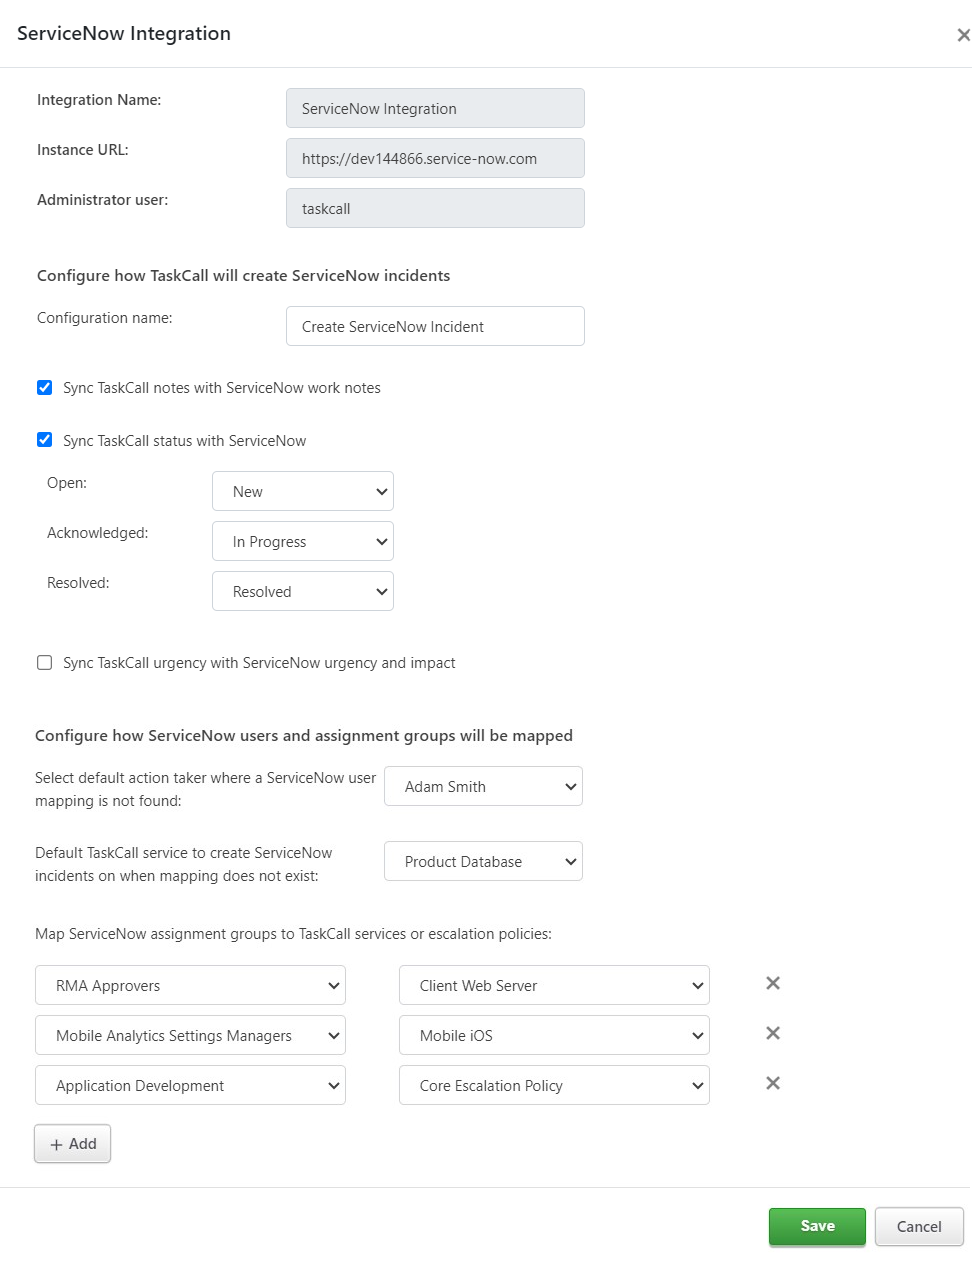
- Give it a configuration name. This is the name that will show on the custom button that will be added on the incident details page with which incidents can be manually created in ServiceNow from TaskCall.
- Choose if incident notes should sync up between TaskCall and ServiceNow. If selected, TaskCall notes will be added as work notes in ServiceNow.
- Choose if TaskCall statuses should sync up with ServiceNow. If selected, when an incident is acknowledged or resolved, the status of the corresponding incident in ServiceNow will be updated according to the mapping.
- Choose if TaskCall urgency should sync up with ServiceNow urgency and impact.
- Select the default user actions taken on ServiceNow should be attributed to in TaskCall. Users are mapped between the two platforms automatically based on their registered emails. If a mapping is not found for an email, then the default user will be used.
- Select the default service assignment groups will be mapped to.
- Map ServiceNow assignment groups with TaskCall services or escalation policies. Based on this, incidents will be assigned to the correct service or escalation policy.
- Click Save when you are done.
- When the integration is set up correctly a new line item will be shown for it on the list of integrations. Copy the Integration URL that is issued.
Step 3: Install TaskCall App in ServiceNow
Move back to ServiceNow for the last part of the integration process.
- Install the TaskCall app in ServiceNow.
- In the app Configurations, paste the Integration URL you copied over from TaskCall. Select whether you want to incidents to be created in TaskCall automatically as soon as a ticket is raised in ServiceNow. If you do not select this, you will still be able to create an incident manually.
- Click Submit.
Done! Now you have finished setting up the integration. It will bi-directionally sync up incidents between TaskCall and ServiceNow. Follow through with the rest of the documentation to familiarize yourself with the functionalities.
If the TaskCall ServiceNow App is not available on your instance, then please follow the steps needed to create business rules to auto create and resolve incidents in TaskCall.
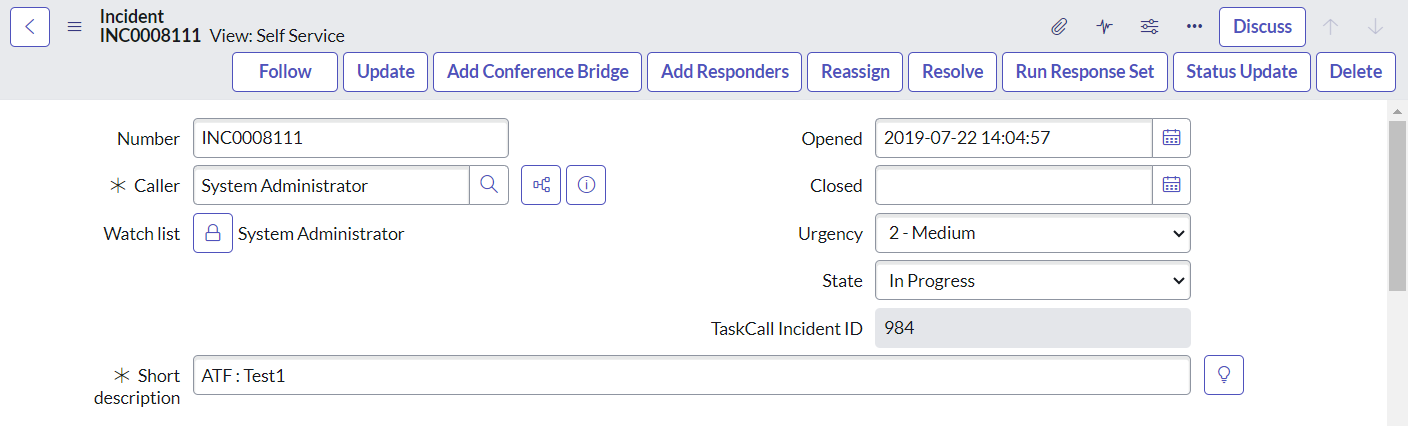
Display TaskCall Incident ID in ServiceNow
When an incident is created in TaskCall and synced up with ServiceNow, the ID of the TaskCall incident is populated in a custom field that comes with the integration. You would want to add this field in your dashboard view. To do so:
- Go to details page of any incident in ServiceNow.
- Click on the hamburger icon on the top left corner and from the drop down menu select Configure > Table.
- Select the TaskCall Incident ID field to be displayed on your incident dashboard and save the changes.
Actions that can be taken from ServiceNow
Multiple actions can be taken in TaskCall from ServiceNow. Actions are available on the panel buttons or the context menu. If the email address of the user who takes the action is registered in TaskCall, then the action will be attributed to the correct user. Otherwise it will be attributed to the default user.
| Action | Location | Purpose |
| Acknowledge | Context Menu | Acknowledge the incident in TaskCall. |
| Add Conference Bridge | Panel Button | Add a conference bridge to collaborate easily with your team members. Conference bridge information that has already been stored in TaskCall will be made available, but custom details can also be added. |
| Add Responders | Panel Button | Add new responders to the incident. |
| Create TaskCall Incident | Context Menu | If auto incident creation is not enabled, then an incident can be created from here manually. |
| Status Update | Panel Button | Post a status update in TaskCall for stakeholders. The update will be made available on the status dashboard. |
| Reassign | Panel Button | Reassign the incident to another responder. |
| Resolve | Panel Button | TaskCall utilizes the existing Resolve button in ServiceNow for resolving incidents in TaskCall. As soon as the incident is resolved in ServiceNow, the corresponding incident will be resolved in TaskCall. |
| Run Response Set | Panel Button | Run a response set in TaskCall to mobilize the response effort. |
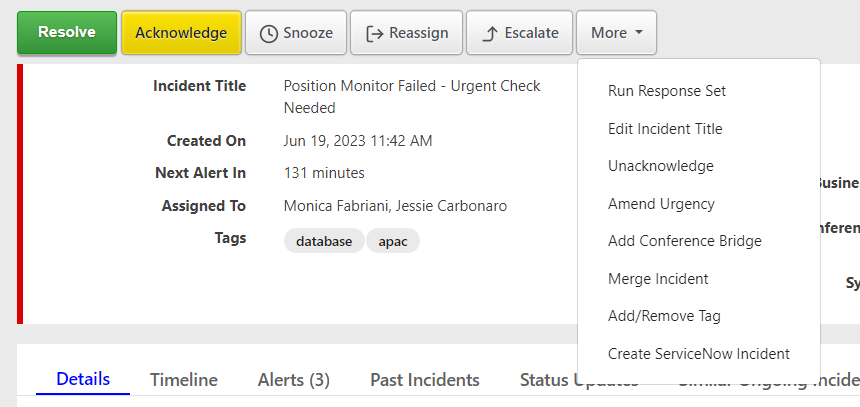
Actions that can be taken from TaskCall
- Create Incident in ServiceNow: A custom button is made available on the incident details page for creating incidents in ServiceNow from TaskCall. The button is shown in the dropdown options of the More button towards the top of the page.
- Acknowledge: When an incident is acknowledged in ServiceNow, the status of the corresponding incident in ServiceNow will be updated. It will also be assigned to the user who takes the action if an account exists in ServiceNow with their email address.
- Resolve: When an incident is resolved, the status of the corresponding incident in ServiceNow will be updated accordingly.
- Amend Urgency: When the urgency of an incident is amended in TaskCall, the urgency and impact of the corresponding incident is updated accordingly.
- Adding Notes: When a note is added in TaskCall, a work note is added in TaskCall. The note will appear as having been posted by the TaskCall User you had set up in ServiceNow.
Create ServiceNow Incident Custom Button
The custom button for creating incidents in ServiceNow will only be made available on the incident details page when an incident occurs on a service. It will not be shown for incidents assigned directly to an escalation policy or a user.
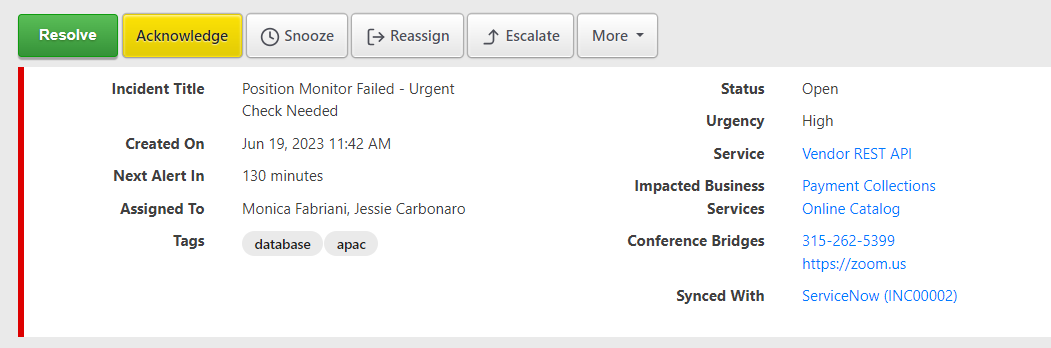
Where to find the synced incidents?
Once a TaskCall incident is synced with a ServiceNow incident, the incident number is displayed on the upper panel on the incident details page next to the Synced with label.
What to do if the TaskCall ServiceNow App is not available on your instance?
In the event you are unable to install the TaskCall ServiceNow application or if it is unavailable on your instance, you will still be able to use some of the functionalities of the integration since majority of the processes are handled from the TaskCall platform. The only limitations will be on the actions you can take from ServiceNow. Namely:
- Add conference bridge
- Add responders
- Acknowledge
- Create TaskCall incident manually
- Reassign
- Run response set
- Post status update
To enable the auto incident creation in TaskCall when a ServiceNow incident is created and auto resolve it when the corresponding incident in ServiceNow is resolved, you will have to complete the following steps.
Set Up Business Rule - Create TaskCall Incident Automatically
- Click on All in the navigation bar and search for Business Rules. From the search results, click on System Definition > Business Rules.
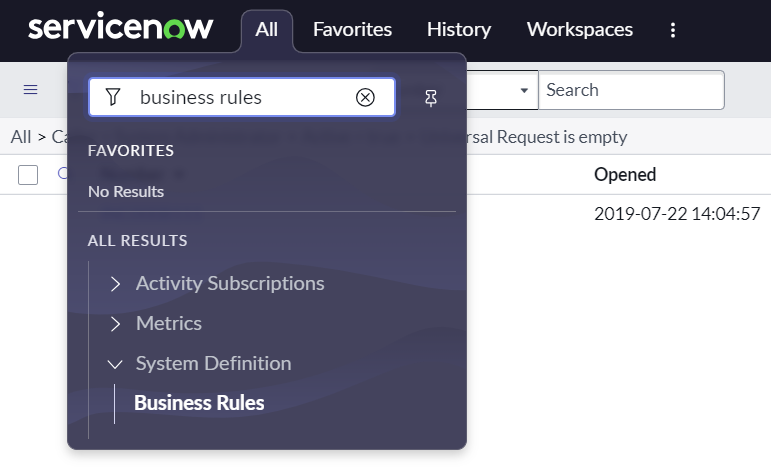
- Once you are on the Business Rules page, click on New on the top right corner.
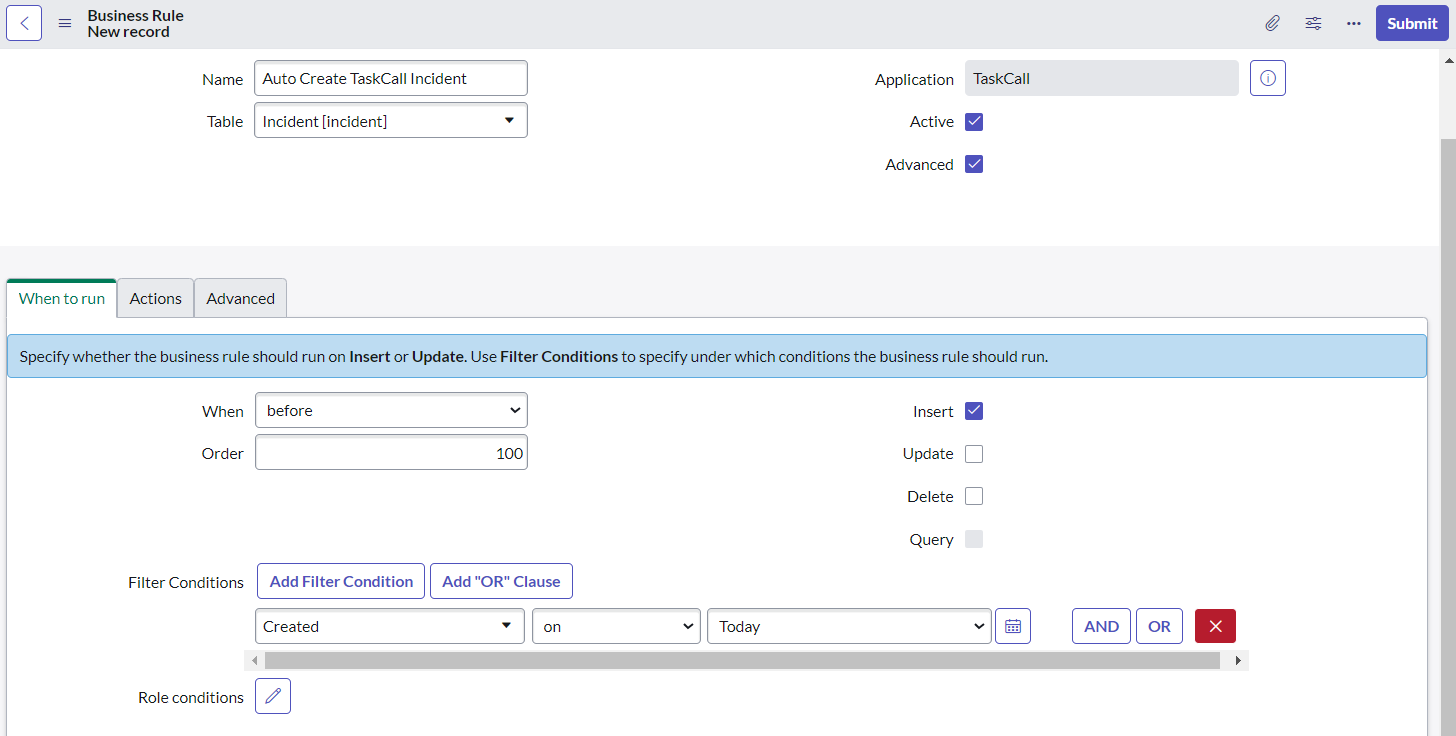
- Give the rule a name (example: Auto Create TaskCall Incident). Select Incident as the table. Check the Active and Advanced options.
- Scroll down go to the When to run tab. Do the following:
- Set When to before.
- Set Order to 100.
- Select the Insert checkbox.
- Add the filter condition: Created on Today.
- Move to the Advanced tab and paste the following code:
(function executeRule(current, previous) {
var usr = new GlideRecord('sys_user');
usr.get('sys_id', current.getValue("caller_id"));
var dataToSend = {
"email": usr.getValue('email'),
"user_name": usr.getValue("userName"),
"sys_id": current.getValue("sys_id"),
"number": current.getValue("number"),
"opened_at": current.getValue("opened_at"),
"impact": current.getValue("impact"),
"urgency": current.getValue("urgency"),
"priority": current.getValue("priority"),
"short_description": current.getValue("short_description"),
"description": current.getValue("description"),
"category": current.getValue("category"),
"subcategory": current.getValue("subcategory"),
"state": current.getValue("state"),
"due_date": current.getValue("dua_date"),
"business_service": current.getValue("business_service"),
"service_offering": current.getValue("service_offering"),
"assigned_to": current.getValue("assigned_to"),
"assignment_group": current.getValue("assignment_group"),
"sla_due": current.getValue("sla_due"),
"problem_id": current.getValue("problem_id"),
"follow_up": current.getValue("follow_up")
};
try {
var ENDPOINT = "<INTEGRATION URL>" + '/create-incident';
var r = new sn_ws.RESTMessageV2();
r.setEndpoint(ENDPOINT);
r.setHttpMethod("post");
r.setRequestHeader("Content-Type", "application/json");
r.setRequestHeader("Accept", "application/json");
r.setRequestBody(JSON.stringify(dataToSend));
var resp = r.executeAsync();
var respBody = JSON.parse(resp.getBody());
var httpStatus = resp.getStatusCode();
} catch (ex) {
gs.error("Error: " + message);
}
})(current, previous);
- Replace the <INTEGRATION URL> placeholder with the Integration URL issued by TaskCall.
- Click Submit when you are done.
Set Up Business Rule - Resolve TaskCall Incident Automatically
- Click on All in the navigation bar and search for Business Rules. From the search results, click on System Definition > Business Rules.
- Once you are on the Business Rules page, click on New on the top right corner.
- Give the rule a name (example: Auto Create TaskCall Incident). Select Incident as the table. Check the Active and Advanced options.
- Scroll down go to the When to run tab. Do the following:
- Set When to after.
- Set Order to 100.
- Select the Update checkbox.
- Add two filter conditions: State changes to Resolved OR Resolved on Today.
- Move to the Advanced tab and paste the following code:
(function executeRule(current, previous) {
var usr = new GlideRecord('sys_user');
usr.get('sys_id', gs.getUserID());
dataToSend = {
'servicenow_incident_id': current.getValue('sys_id')
};
if (usr != null && usr.getValue('email') != null){
dataToSend['email'] = usr.getValue('email');
}
var ENDPOINT = "<INTEGRATION URL>" + '/resolve';
var r = new sn_ws.RESTMessageV2();
r.setEndpoint(ENDPOINT);
r.setHttpMethod("post");
r.setRequestHeader("Content-Type", "application/json");
r.setRequestHeader("Accept", "application/json");
r.setRequestBody(JSON.stringify(dataToSend));
var resp = r.executeAsync();
resp.waitForResponse(5);
var respBody = JSON.parse(resp.getBody());
var httpStatus = resp.getStatusCode();
if (httpStatus != 200){
gs.addErrorMessage(respBody);
}
})(current, previous);
- Replace the <INTEGRATION URL> placeholder with the Integration URL issued by TaskCall.
- Click Submit when you are done.
With the two above business rules set up in ServiceNow, you will still be able to bi-directionally sync up incidents and get off the ground even when the TaskCall ServiceNow application is not available on your instance.