Okta Integration Guide
Okta is an identity provider that allows companies to use a single source of credentials to log in to cloud applications. With the number of applications that companies now use to maintain their system, it can become increasingly burdensome to ensure access security. Okta allows companies to handle all their application access requirements from one place.
TaskCall integrates with Okta to give users the ability to log in with their Okta credentials. Enable auto provisioning to allow users to register on to the platform on the very first sign in without system admins having to give separate permissions.
Supported Features
- Our Okta integration enables SP initiated login, meaning that the login process is initiated in TaskCall. You simply need to enter your TaskCall account subdomain at the time of login and we take care of the rest.
- Since your organization members are already verified in Okta, accounts can be automatically provisioned for them in TaskCall upon first login, saving you the trouble of adding each user separately again.
Pointers
- TaskCall’s Okta integration is based on the OIDC (OpenID Connect) protocol using OAuth 2.0.
- Only the account Owner is able to configure SSO settings for the organization.
- SSO authentication can be enabled for only one identity provider at a time.
Install TaskCall Okta App
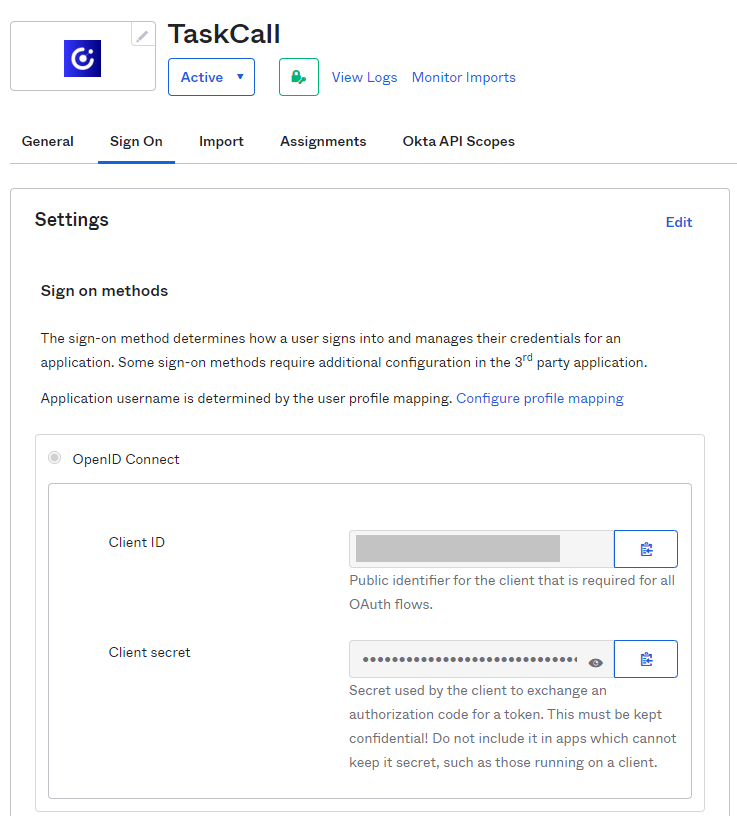
At first you need you need to install the TaskCall Okta App. We will need the client ID and client secret of the installed app later.
- Go to you Okta admin account.
- From the navigation panel on the left, scroll down to the Applications section and then click on Applications.
- On the Applications page, click the Browse App Catalog button.
- Then search for TaskCall and install the application.
- After you have installed the application, take a note of the client ID and client secret that is generated for your TaskCall Okta App.

Configure Okta
- Log in to your TaskCall account.
- Click on the dropdown mennu next to your profile picture on the top right corner of the navigation bar and select Organization. Only the Owner of the organization will be able to access the Organization page.
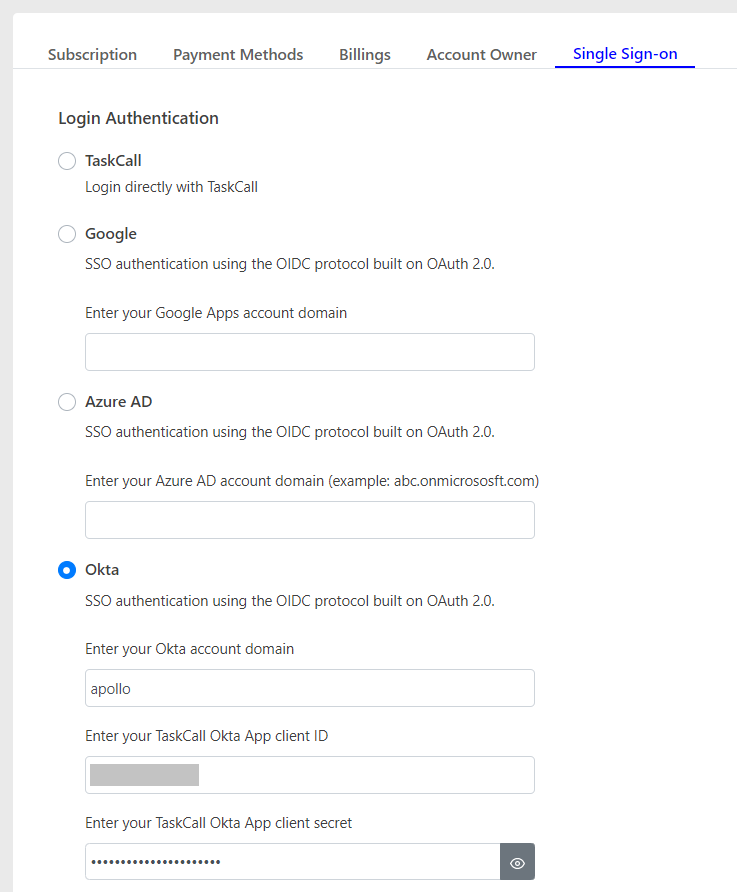
- Scroll down to the middle of the page and click on the Single Sign-On tab.
- Select the Okta radio button and enter your company's Okta domain (example: abc.okta.com), along with the Client ID and Client Secret of the TaskCall app you installed in Okta.

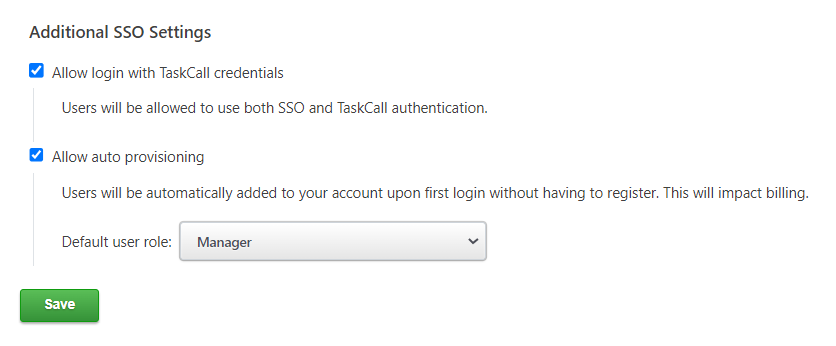
- Scroll down to the Additional Settings section.
- If you want the users to be able to log into TaskCall using both their SSO credentials and TaskCall credentials, then select the Allow login with TaskCall credentials checkbox.
- If you want to allow users to be able to auto-register on first sign in using their SSO credentials, then select the Allow auto provisioning checkbox. Do understand that this will impact your monthly billing as billing is done based on the number of users you have on your account in a given month.
- If you choose to enable auto provisioning, you must also select the default role to assign to the user when they are registered. Of course, you will be able to edit the user role after the user is registered if you want to.

- Click Save once you are done and that’s it. You can now sign in using your Okta credentials.
Log In with Okta
TaskCall does not allow Okta initiated log in at the moment. The login process must be initiated from TaskCall.
- Go to your TaskCall Log In page.
- Select the option to Log In With Your Identity Provider.
- Enter your TaskCall account subdomain and press enter.
For more details on how to log in with SSO please refer to the Single Sign-On guide.