Conditional Routing
Conditional routing is a powerful tool that allows incoming alerts to be handled in a customized manner. It gives organizations full control to dictate how alerts coming in from their various services and integrations should be treated. It is incredibly efficient in reducing alert noise so you do not get clustered with too many alerts and can narrow down the scope of triggered incidents to only those that are important.
When an alert is received, TaskCall goes through all the conditional routing you have set up and applies the very first rule that fits the received alert. If the routing is configured to trigger an incident, then an incident is created. Otherwise it is handled the way described by the routing actions.
Conditional routing is only applied on alerts received through the Incidents API, integrated services and emails. They are not applied on manually created incidents and incidents created from pre-scheduled alerts.
Creating Conditional Routing
To create a conditional routing rule:
- Go to: Automation > Conditional Routing > New Rule.
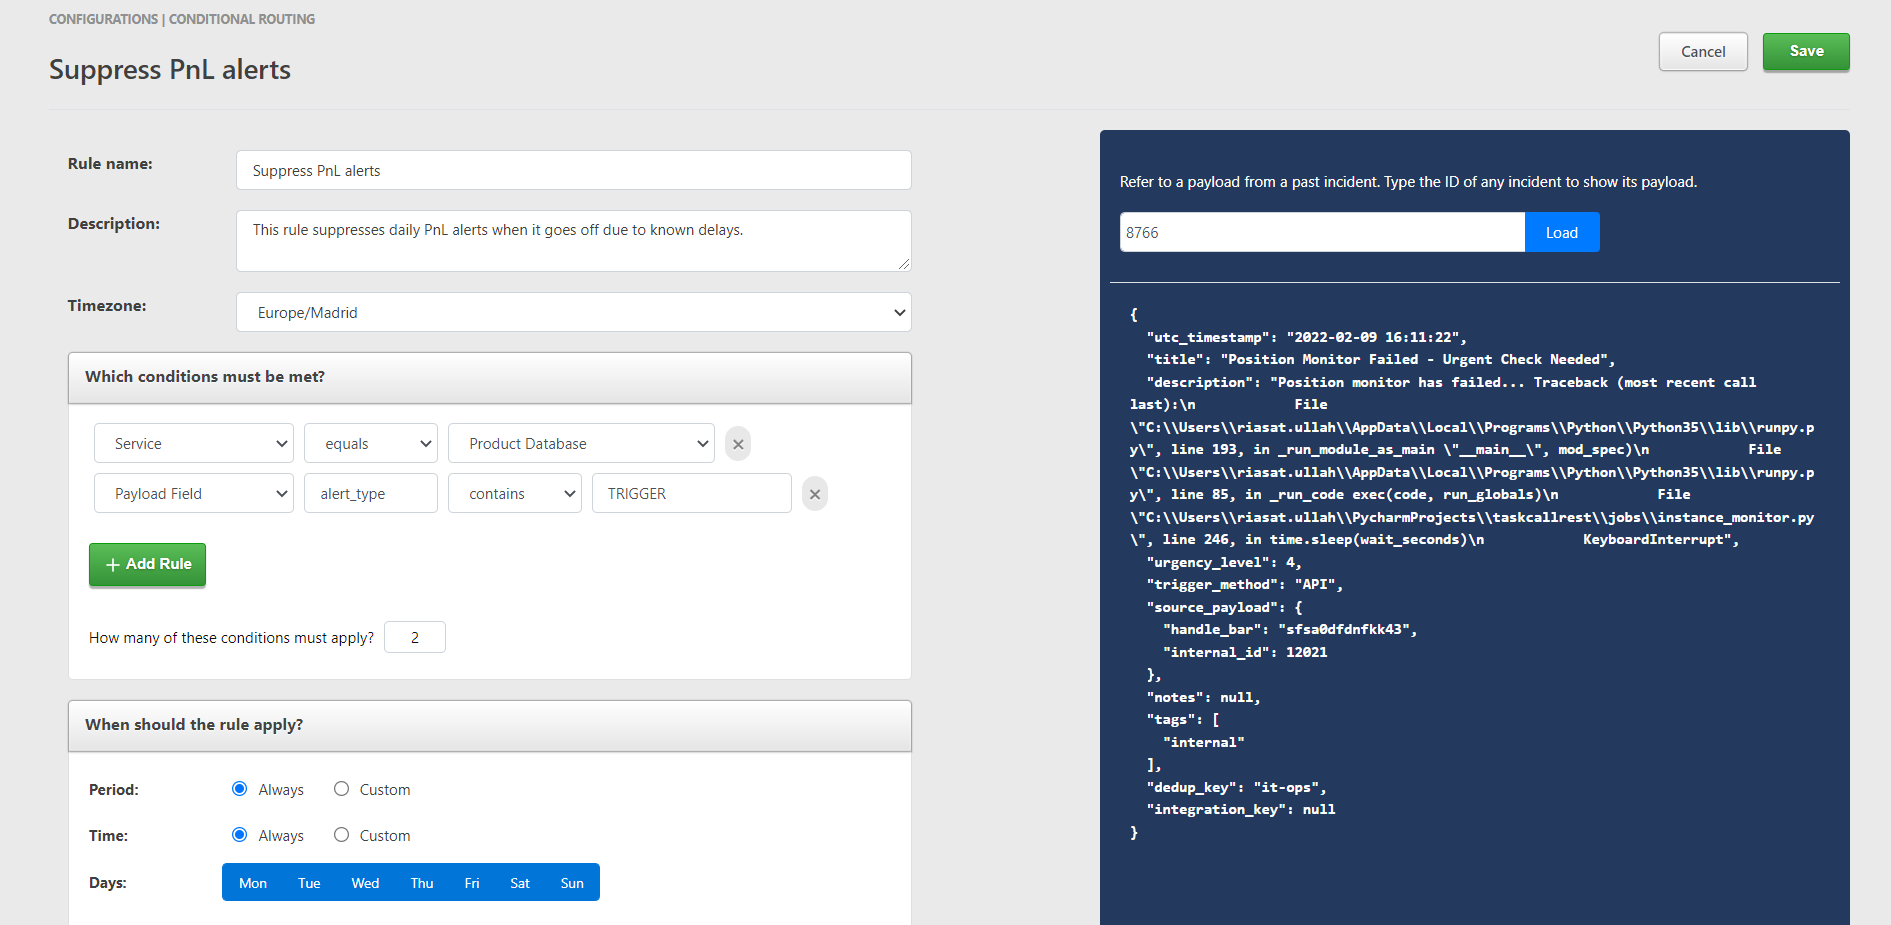
- Give the routing a name and describe what it is for.
- Set the timezone the routing will be applicable for. If the rule is configured to apply only for a certain period of the day or days of the week, the timezone will be used to calculate the correct time applicability.
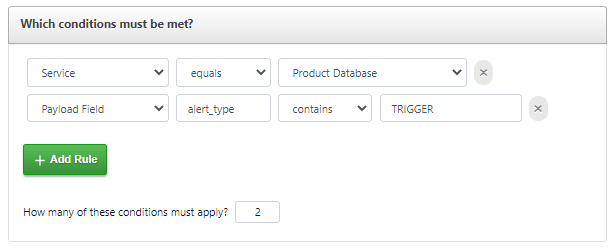
- Set the conditions that must be met for this routing to apply on an incident. Read the section below on configuring the conditions to understand morre about this step.
- Click on "Add Rule" to add more conditions.
- Set the number of conditions that must be met before this conditional routing rule will become applicable on an incoming alert. If you have set two conditions and set the minimum number of conditions that must be met to 2 as well then both the conditions have to be true on the incoming alert. If you set the minimum number to 1, then as long as at least 1 of the two conditions are true, the conditional routing will apply.
- Select the date and times you want to this conditonal routing to be applicable on. If you want it to apply all the time, then select "Always". Otherwise select the custom periods and times.
- Select the actions that should be taken on the alert.
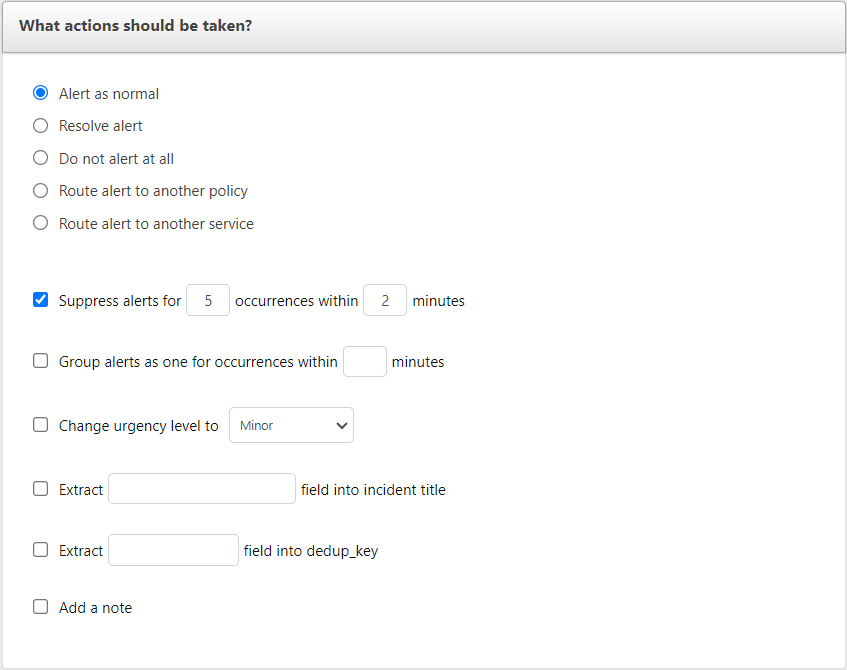
- Alert as normal - An incident will be created like normal. No special actions will be take on it.
- Resolve Alert - An incident will be created but resolved immediately. It will be listed under "Resolved Incidents". No assignments will be made and no alerts will be sent out to responders.
- Do not alert at all - The alert will be suppressed and no incident will be created. It will be visible under the "Alerts" tab on the incidents list page.
- Route to another policy - This will trigger an incident but it will be assigned to the selected policy instead of the assignees the alert was initially sent for. Notifications will be sent out to the users who will be on-call for the selected policy at the time.
- Route to another service - This will allow the incident to be created on a specific service. If based on certain conditions it seems more fitting for the alert to be assigned to a different service, then this option can be used. Please note that the service specific actions like running response sets will still be applied for the original service before being re-routed. Hence, it might be best to avoid having any service specific actions for the original service if the alert must be re-routed.
- The alert can be suppressed based on similar occurrences within a certain number of minutes. If both suppression and grouping is set, thenn suppression will take priority.
- The alert can be grouped together with incidents that have been triggered from similar alerts that have occurred within a certain number of minutes. Notifications are not sent out to responders for grouped alerts, but they are visible under the "Alerts" tab on the incidents list page. It will also be visible as an alert on the "Incident Details" page of the incident it was grouped with.
- Increase the urgency of the alert or de-prioritize it.
- Extract a field from the payload and use that as the title of the incident.
- Extract a field from the payload and use it for de-duplication. If a dedup key is provided in a payload, it will automatically suppress the alert if an open incident exists with the same dedup key.
- Add a note on the incident to be triggered to help responders better handle the incident.
- Click Save.
Configuring Conditions
The conditions of the routing are set on attributes and their values in the payload that is received by our system. A few of the internal attributes are taken care of with built-in attributes, but you can choose to get any custom attribute as well.
You can pull the actual payload of a past incident from our server and check through it to get the correct attributes and values you want to use for the conditions. To get the payload, type the Incident ID of an incident on the right panel and press "Load".
- Select the type of attribute.
- If you select the "Payload Field" attribute, then you also need to specify the name of the field. Sub fields are separated by dots. In the example above we want the "TopicArn" field from the payload. The "TopicArn" field is a sub field of "Message", which is why we set the field name as Message.TopicArn.
- Next choose how the expected value should be evaluated.
- contains - If the attribute consists of multiple values and you want one of the values to match your expected value.
- equals - If the value of the attribute from the payload must be exactly the same as the expected value.
- exists - A value is not needed for this. This will check if the field exists or not.
- matches - If "matches" is selected then a regular expression must be provided. The match is done based on the regex. Please make sure that you provide a valid regex. We will not check for its validity. (For those who are not familiar with regular expressions; it is a programming tool that allows texts to be parsed to see if they match a certain format).
- not contains - If the attrbute contains multiple values, but you do not want any of the values to be equal to the expected value.
- not equals - If the value of the attribute from the payload must not be equal to the expected value.
- not exists - This ensures that the field does not exist in the payload.
- not matches - The value of the attribute in the payload does not match the provided regular expression.
- Set the value. (Remember that if you choose the "matches" or "not matches" evaluator then the value must be a regular expression.)