TeamDynamix Integration Guide
TeamDynamix is a no-code ITSM (IT Service Management) and PPM (Project Portfolio Management) platform. TaskCall provides a bi-directional integration with TeamDynamix. Tickets are created in TeamDynamix as soon as an incident occurs in TaskCall. Similarly incidents are created in TaskCall for corresponding tickets in TeamDynamix. Statuses, priorities and notes automatically sync up. The integration helps to keep issues consistently accesible across the platforms and enable seamless operations.
Pricing Plans
TaskCall's TeamDynamix integration is only available on the Business and Digital Operations pricing plans.
Pointers
- Incidents can be created in TaskCall from TeamDynamix manually/automatically.
- Tickets can be created in TeamDynamix from TaskCall manually/automatically.
- Tickets and incidents sync up automatically.
- Multiple services can be integrated with the same TeamDynamix account. It gives you the flexibility to dictate how tickets will be created in TeamDynamix from TaskCall.
- Credentials of a TeamDynamix admin are required to set up the integration.
In TaskCall – Configure Integration
In TaskCall you will define how TeamDynamix tickets will be created and synced up with TaskCall incidents. All the steps must be performed at once until completion. Otherwise, you will have to reinitiate the process from the beginning.
- Go to Configurations > Services. Select the service you want to integrate with.
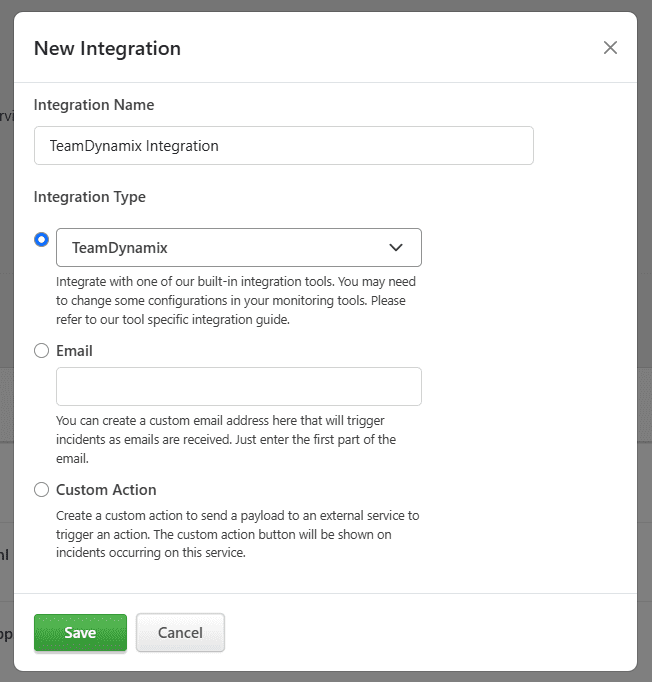
- Once you are on the Service details page, go to the Integrations tab. Click on New Integration.
- Give the integration a name.
- From the integration types, select the top radio button indicating that you are trying to use a built-in integration.
- From the list of built-in integrations, select TeamDynamix.
- Click Save.
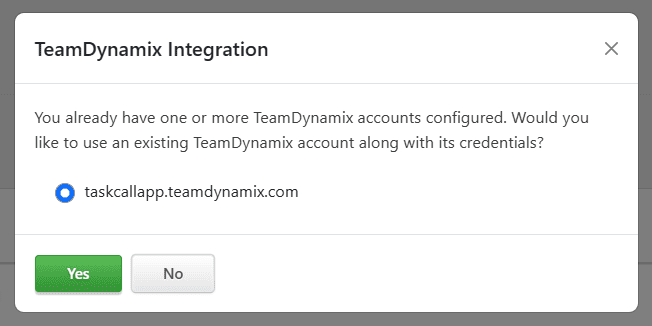
- You will then be prompted to choose or provide your TeamDynamix admin credentials. If you already have one or more TeamDynamix integrations in place, then you will have the option to choose one of the existing domain credentials to set up this integration with. This way you can avoid providing the same information multiple times.
- If you decide to set up the integration with an existing account information, then TaskCall will use that domain and credentials for this integration as well. You will be taken to the final step to configure the integration.
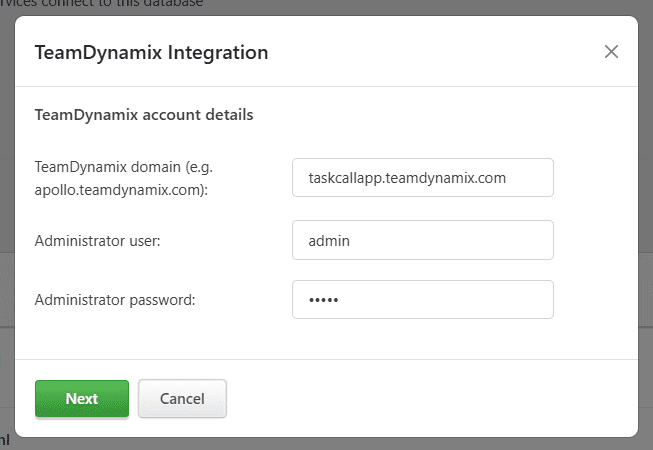
- If you do not have an existing TeamDynamix integration or chose not to use the credentials from an existing integration, then you will be prompted to enter the details of your TeamDynamix account.
- Here you must provide your TeamDynamix account domain, the username and password of an admin. The domain must be in its full form (e.g. apollo.teamdynamix.com). The admin username and password are needed to obtain a token with which API calls can be made to TeamDynamix to create tickets and sync up with TaskCall incidents. These credentials will not be displayed to you again or be accessible by you. They are stored securely by TaskCall and are only used for making the API calls to sync up tickets and incidents.
- Click Next when you are done to be taken to the final step of the integration.
- In the next modal that opens up, configure how tickets will be created in TeamDynamix from TaskCall:
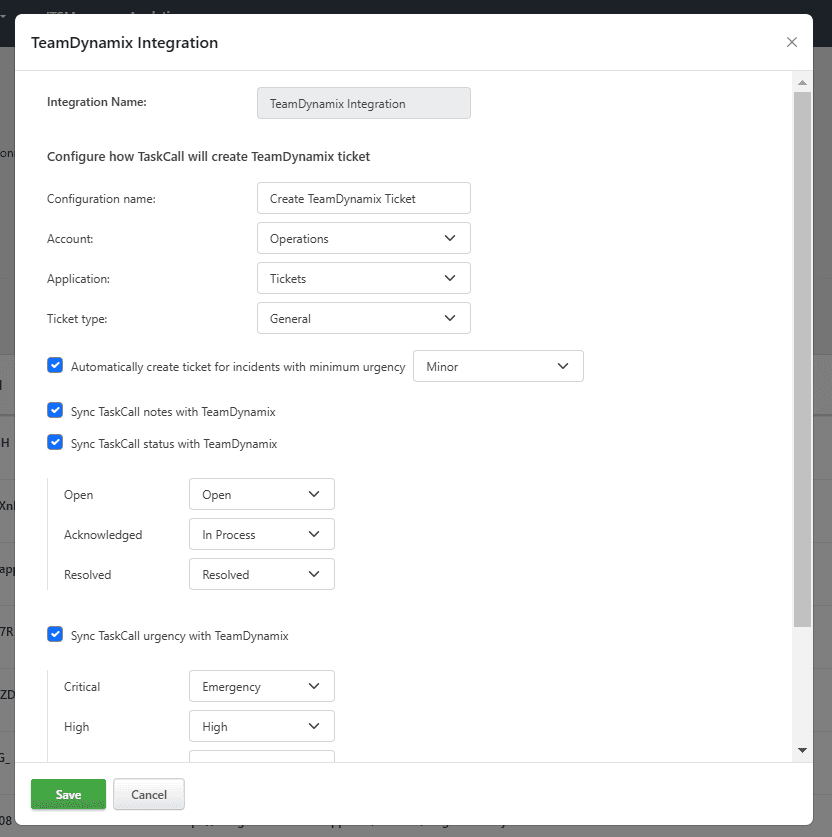
- Enter a configuration name (e.g. Create TeamDynamix Ticket). This name will be given to the custom button that will be displayed for you on the Incident details page if you choose to create the tickets manually. This button will be displayed in the dropdown More in the incident actions button panel on the page.
- Select the department account tickets should be created for.
- Select the ticketing application where the tickets should be created.
- Select the type of ticket that should be created.
- Select whether you want to create TeamDynamix tickets manually or automatically. If you choose to create it manually, then you will be able to do so from the custom button that will be displayed for you on the Incident details page as mentioned above. The button will only be displayed for incidents that are triggered on the integrated service.
If you choose to create tickets automatically, then whenever an incident occurs on this service, a TeamDynamix ticket will be created if the urgency of the incident is at least equivalent to the minimum chosen urgency. - Choose whether you would like TaskCall notes, statuses and urgency levels to be synced up with TeamDynamix. If you decide to sync, you will also have to select how TaskCall statuses and urgency levels will be mapped to TeamDynamix statuses and priorities respectively.
- Click Save when you are done.
After this you will be able to create tickets in TeamDynamix from TaskCall incidents. If you would also like to create incidents in TaskCall from TeamDynamix tickets, then please move on to the next section.
Create a Webhook in TeamDynamix
TeamDynamix can be configured to trigger a webhook when a ticket is created or updated. It can be used to create an incident in TaskCall and sync up with tickets. Webhooks require a URL endpoint. When you configured and completed the integration in TaskCall, an Intergation URL was generated. We will use that as the endpoint for the webhook.
- In your TaskCall account, go to Services. Select the service you configured your TeamDynamix integration on. On the services page go to the Integrations tab and find your TeamDynamix integration. Copy the Integration URL that has been issued for it.
- Now go to the administrator portal of your TeamDynamix account.
- Go to Applications. Select the ticketing application you want to create the webhook for. Then from the navigation panel on the left select Webhooks. Click New.
- Give the webhook a name and a description. Check the Is Active checkbox. Paste the Integration URL you copied over from TaskCall in the URL field. Ensure the content type is set as application/json. Keep SSL verification enabled. Select the Ticket Created and Ticket Changed events as the triggers for this webhook.
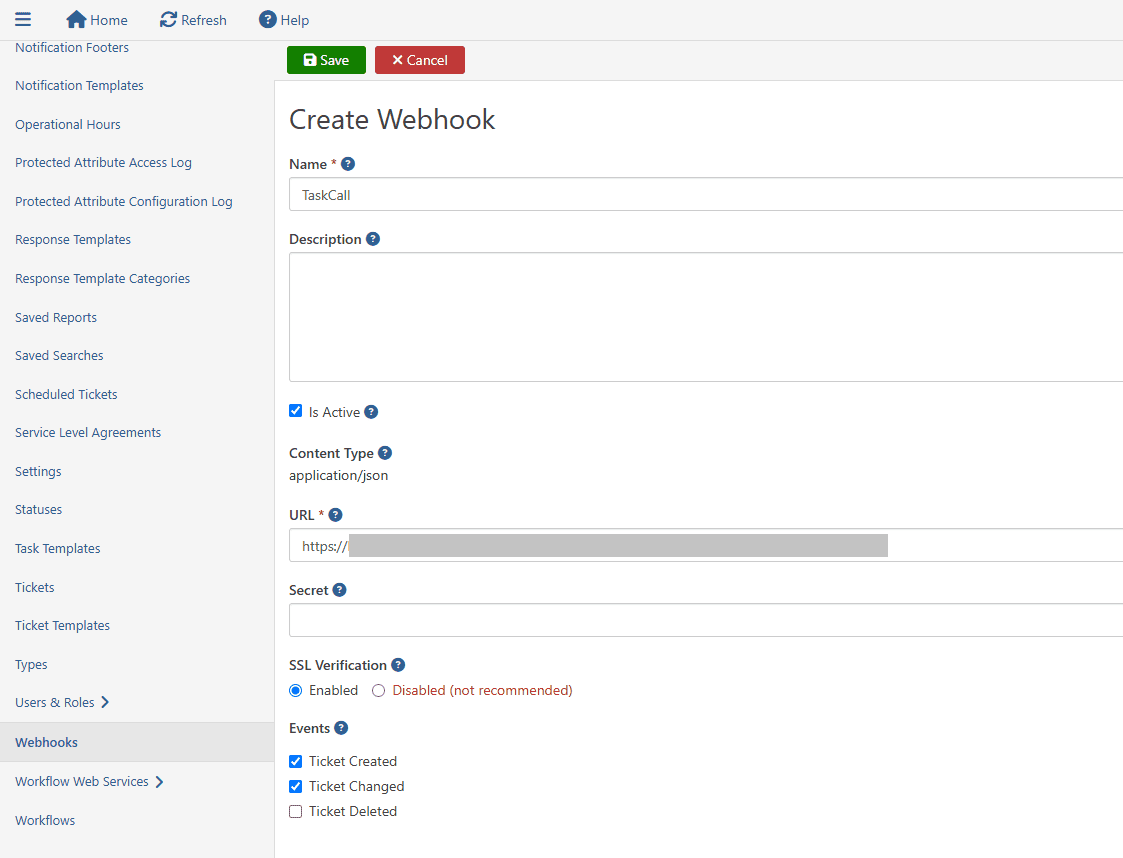
- Click Save. That's it!
Your integration is now ready to bi-directionally sync up TeamDynamix tickets and TaskCall incidents.
How to manually create TeamDynamix ticket?
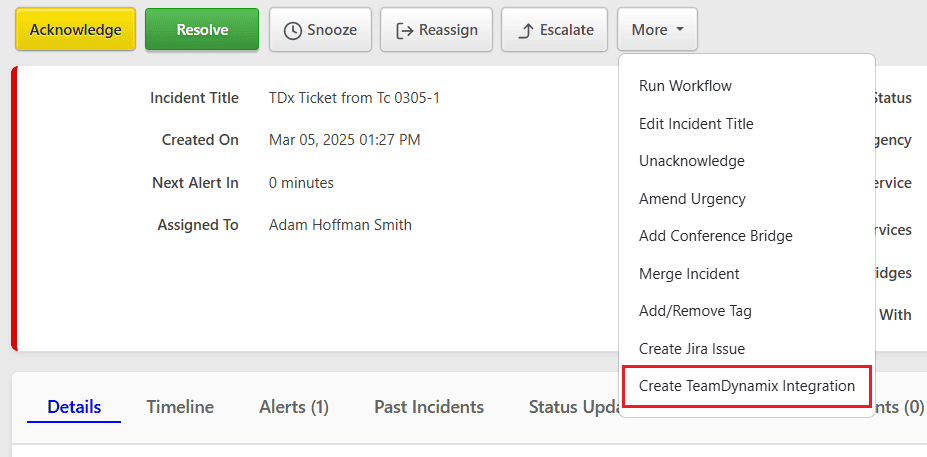
If you chose the option to manually create tickets in TeamDynamix when you set up the integration, TaskCall will display a custom button for you on the incident details page of the incidents that occur on the integrated service. The button is shown in the dropdown options of the More button towards the top of the page. By clicking this button, you will be able to create a ticket in TeamDynamix.
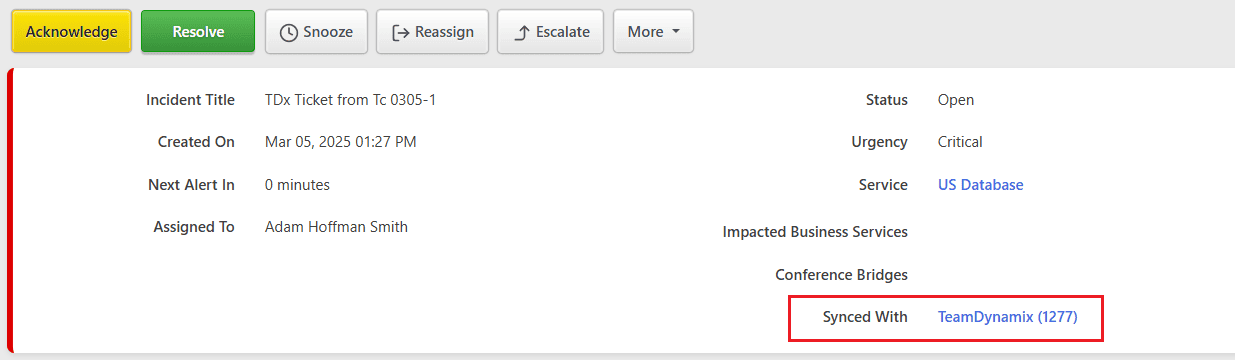
Where to find the synced tickets?
Once a TaskCall incident is synced with a TeamDynamix ticket, the ticket ID is displayed on the upper panel on the incident details page next to the Synced with label.