On-Call Schedule Examples
Routines define how your on-call team’s schedule (and schedule alone) will look like – who is going to be on call on which days, for how long and how they will rotate. TaskCall’s routine creation is extremely flexible and lets you define any routine you can think of. It does so by letting you split a day in as many segments as you want. These segments are called Layers. Layers help you specify how your team’s on-call rotation will be like within a given period of time on a day.
On the other hand, escalation policies help you stack routines (or users) in levels in a way that if the primary on-call do not respond to an incident, it will automatically be assigned to the secondary. TaskCall does not limit how many levels an escalation policy can have and so you can create as multiple levels of escalations if you need to.
We have put together several scenarios to help you understand what how routines and escalation policies work together. They are intended to help you understand the concepts more clearly and act as templates to help you manage your own on-call schedule.
Routine layers are not for escalation
Please do not confuse Routine Layers with escalations. Escalation are only handled by Escalation Policies. Routine layers only allow you to split your day into multiple segments.
Example 1: 24 hour on-call role starting at midnight
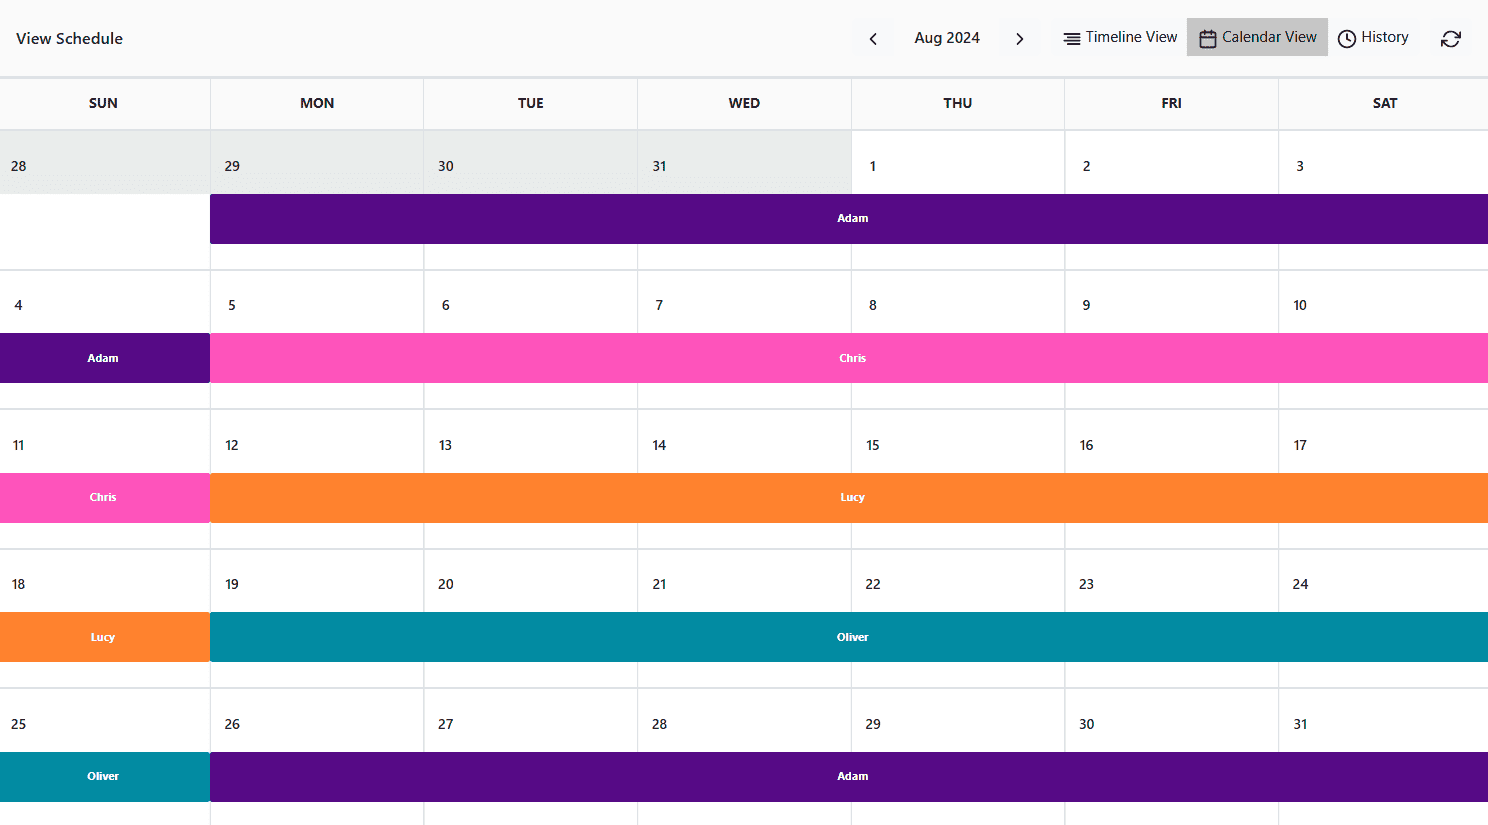
The first example scenario is for a team that has a 24 hour on-call support where the support hour starts at midnight – 12:00 AM. There are 4 people on the team. The responsibility rotates between them once a week. The rotation happens every Monday at midnight. Only 1 person is on call at any given point in time.
Solution
- Create a routine with the following configurations
- Only 1 layer is needed.
- Add all 4 team members one after another.
- Make the shift start at 12:00 AM.
- Set the duration to 24:00 hours.
- Rotate every 7 days.
- Starts on the date of the prior Monday. If today is Wednesday, the 31st of July 2024, the start date should be the 29th of July. The rotation happens every 7 days, so the only way to ensure that it rotates on Monday is by making sure it starts on a Monday. This is very important.

Example 2: 24 hour on-call role starting at midnight with escalation
This example is a continuation of Example 1 above. The difference is that this time we will add an escalation. Having an escalation level ensures that if the primary on-call misses the incident by any chance, it will automatically be assigned to the secondary on-call.
The primary on-call will be defined by the routine we created above while the secondary on-call will be the individual who served as the primary on-call the previous week. This means that someone who serves as primary on-call on Week 1, will become secondary on-call on Week 2, and then will get Week 3 and Week 4 off before becoming the primary on-call again on Week 5.
Solution
- Create 2 routines. Make sure they both have the same time zone.
- Routine 1 – Same as the routine created in Example 1.
- Routine 2 – Almost same as the routine created in Example 1, except for the order in which the members are put in rotation. Everyone will drop 1 step down in a form of a queue. The person who was in Week 1 will be moved to Week 2 and so on. Only the person who was in the last position (Week 4) will be moved up to the first position (Week 1).

- Create an escalation policy with 2 levels.
- Level 1 – Assign Routine 1 here.
- Level 2 – Assign Routine 2 here.
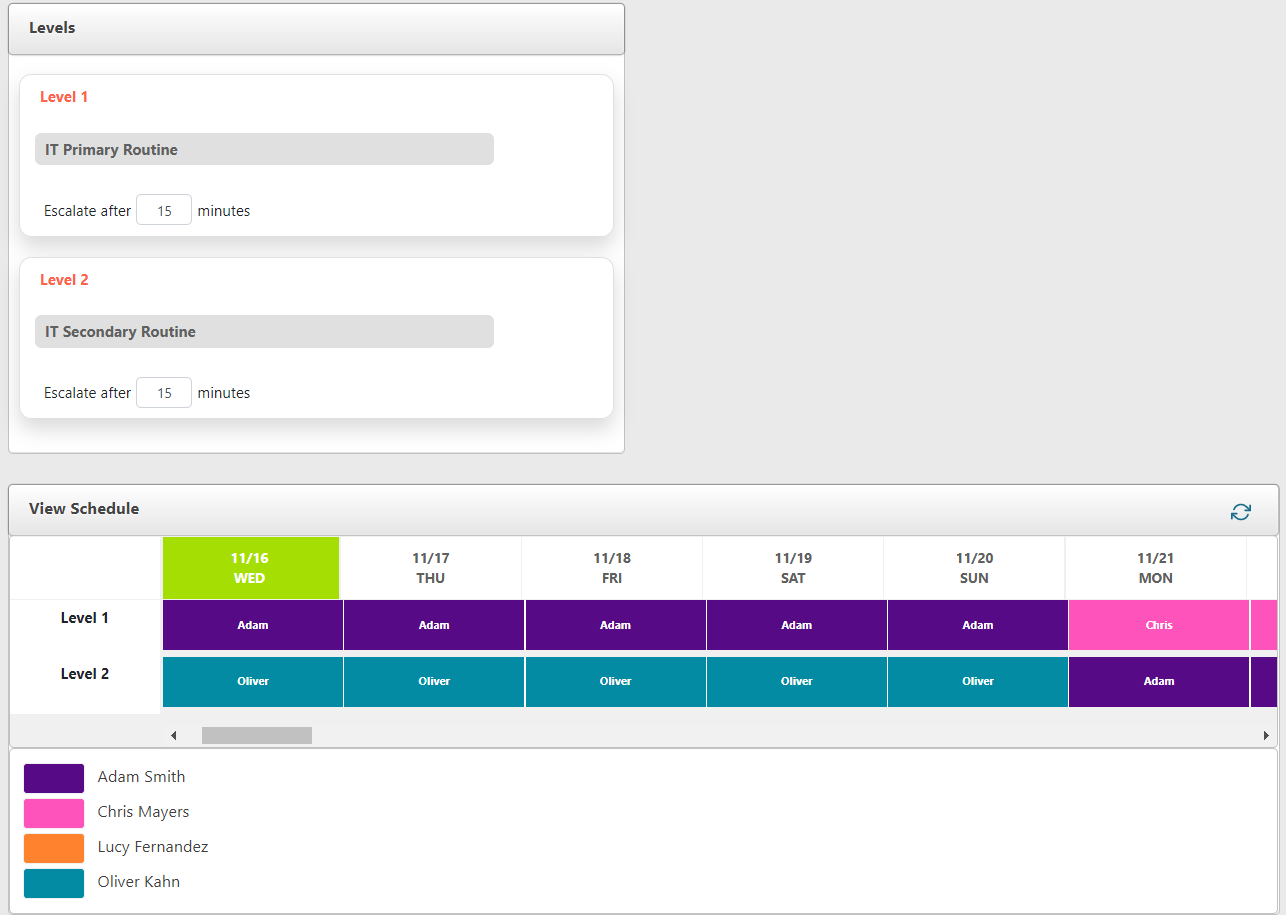
You may see that the color assigned to the users in the escalation policy is different from that in the routines. This is because the color is specific to the item in question, not to a user. Always refer to the color assignments shown at the bottom of the final schedule.
Routine time zone
Always make sure to choose the correct time zone when creating a routine. Otherwise, you will not get the desired schedule.
Example 3: 12 hour on-call role starting at 6 AM with escalation policy
Example 3 is for a team of 3 – 2 developers and 1 manager. The developers are the primary responders. Developer 1 works from 6 AM to 6 PM. Developer 2 works from 6 PM to 6 AM the following day. Both of their back up is always the Manager.
Solution
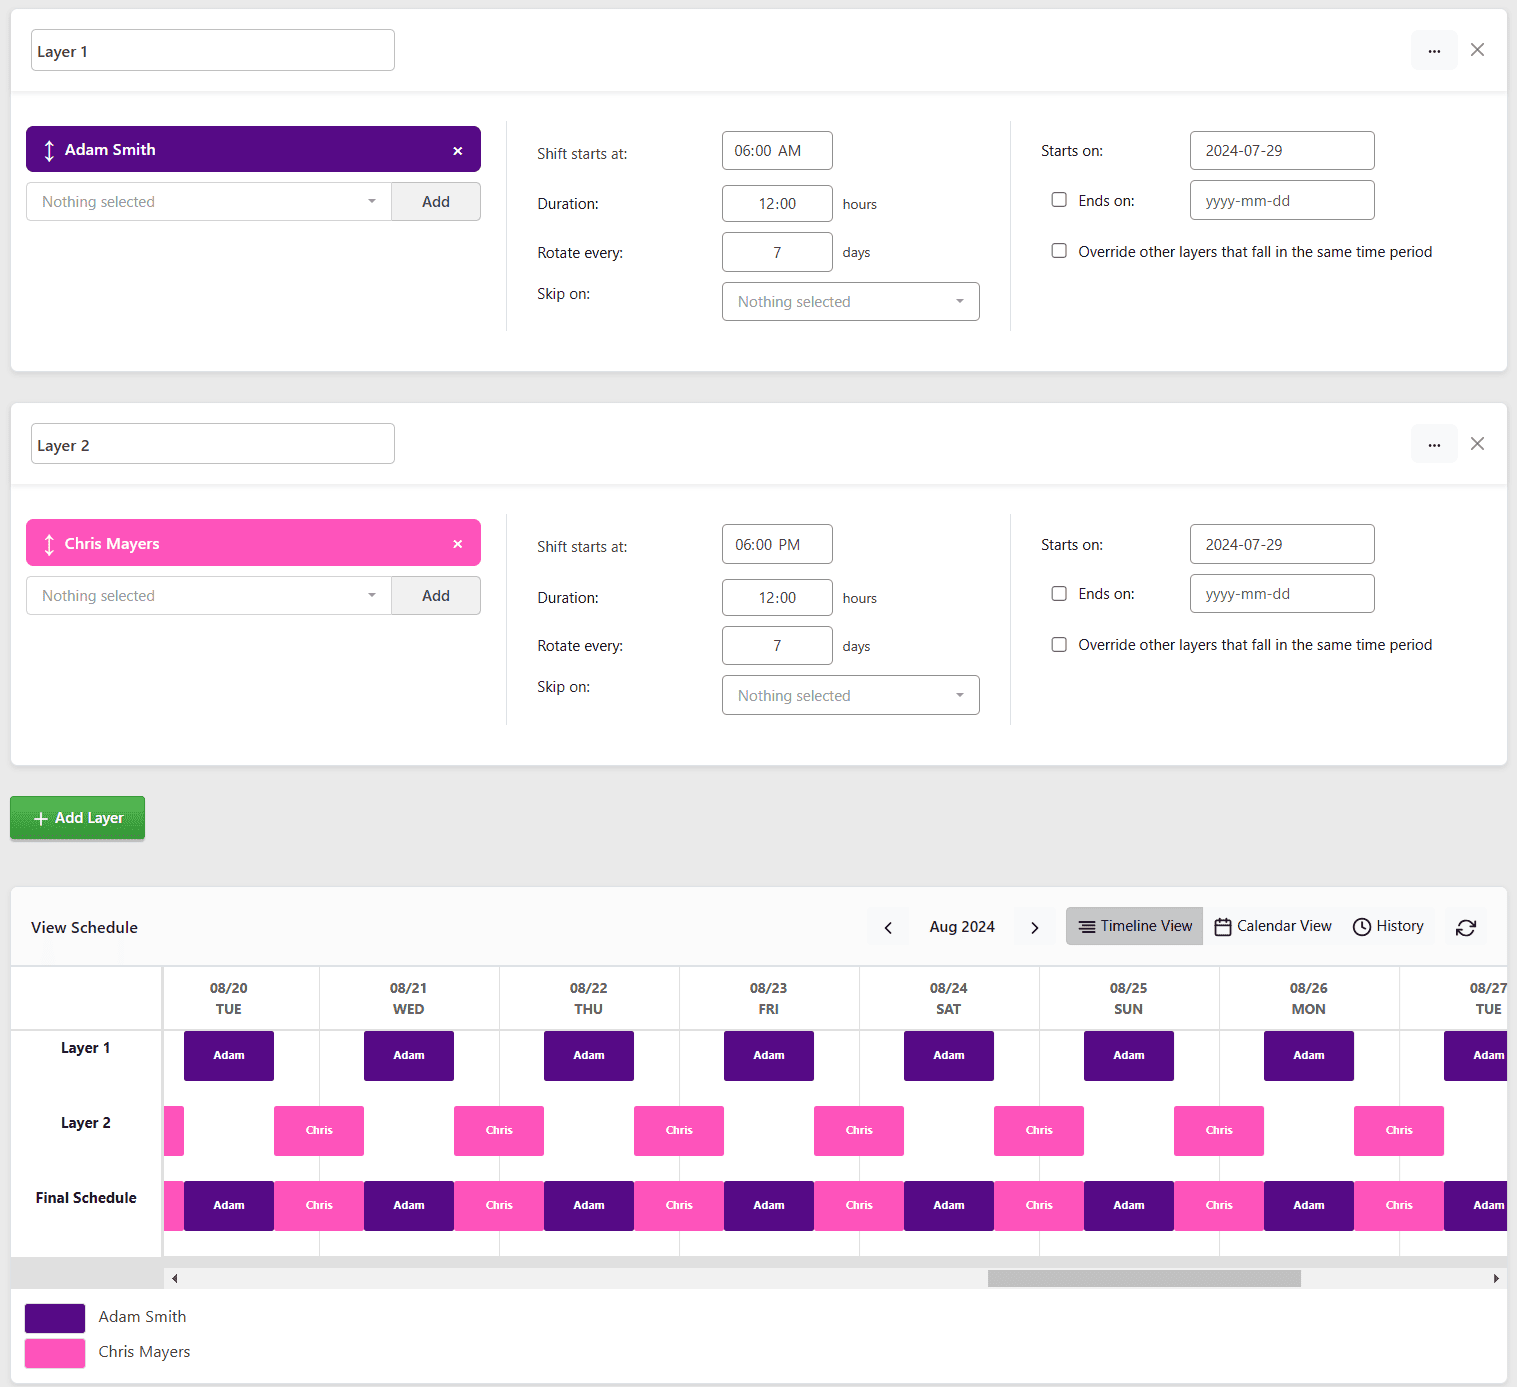
- Create a routine with 2 layers.
- Layer 1
- Add Developer 1 as the only assignee for the layer.
- Make the shift start at 06:00 AM.
- Set the duration to 12:00 hours.
- Rotate every 1 day (it actually does not matter how many days you have here since there is only 1 assignee, meaning in essence there is no rotation).
- Choose the day the layer starts on.
- Layer 2
- Add Developer 2 as the only assignee for the layer.
- Make the shift start at 06:00 PM.
- Set the duration to 12:00 hours.
- Rotate every 1 day.
- The layer should start on the same day as Layer 1.
- Layer 1
- Create an escalation policy with 2 levels.
- Level 1 – Assign the routine you created here.
- Level 2 – Assign the Manager to this level.
Example 4: 24 hour on-call role rotating every 7 days with handoff on Monday at 9 AM
Example 4 is for a team of 3. Each person goes on-call for 24 hours from Monday at 9 AM to 9 AM the following Monday. The rotation happens every 7 days on Monday.
Solution
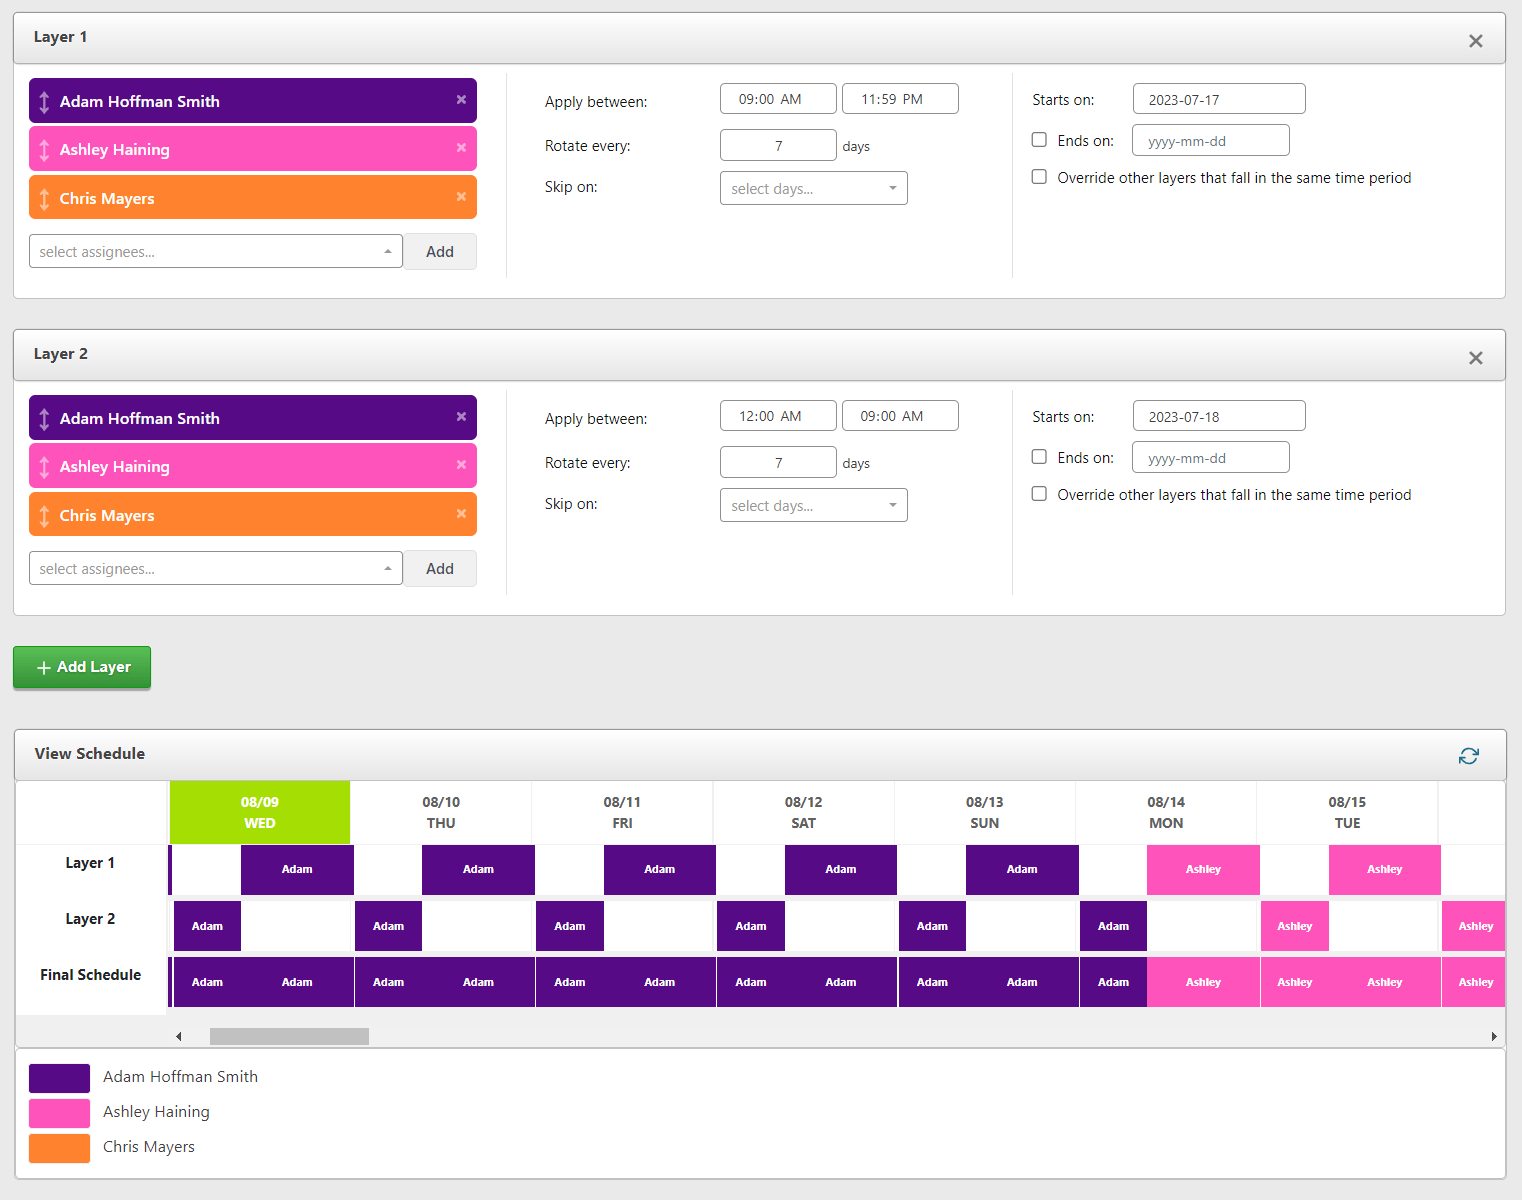
- Create a routine with 1 layer.
- Layer 1
- Add all 3 people in rotations.
- Make the shift start at 09:00 AM.
- Set the duration to 24:00 hours.
- Rotate every 7 days.
- Choose the first Monday the routine should start on. We are using July 17, 2023.
- Layer 1
- Now you can add this routine to an escalation policy if you want.
Example 5: Different schedules for weekdays and weekends
In this example, we will show how you can accommodate a schedule that varies between weekdays and the weekend all in one routine. For simplicity we will work with a 24 hour on-call role for a 3 people team. The first two people will be in rotation every day during the week. The third person will only be on-call during the weekends. To create this schedule, we will utilize the Skip days setting of routine layers.
Solution
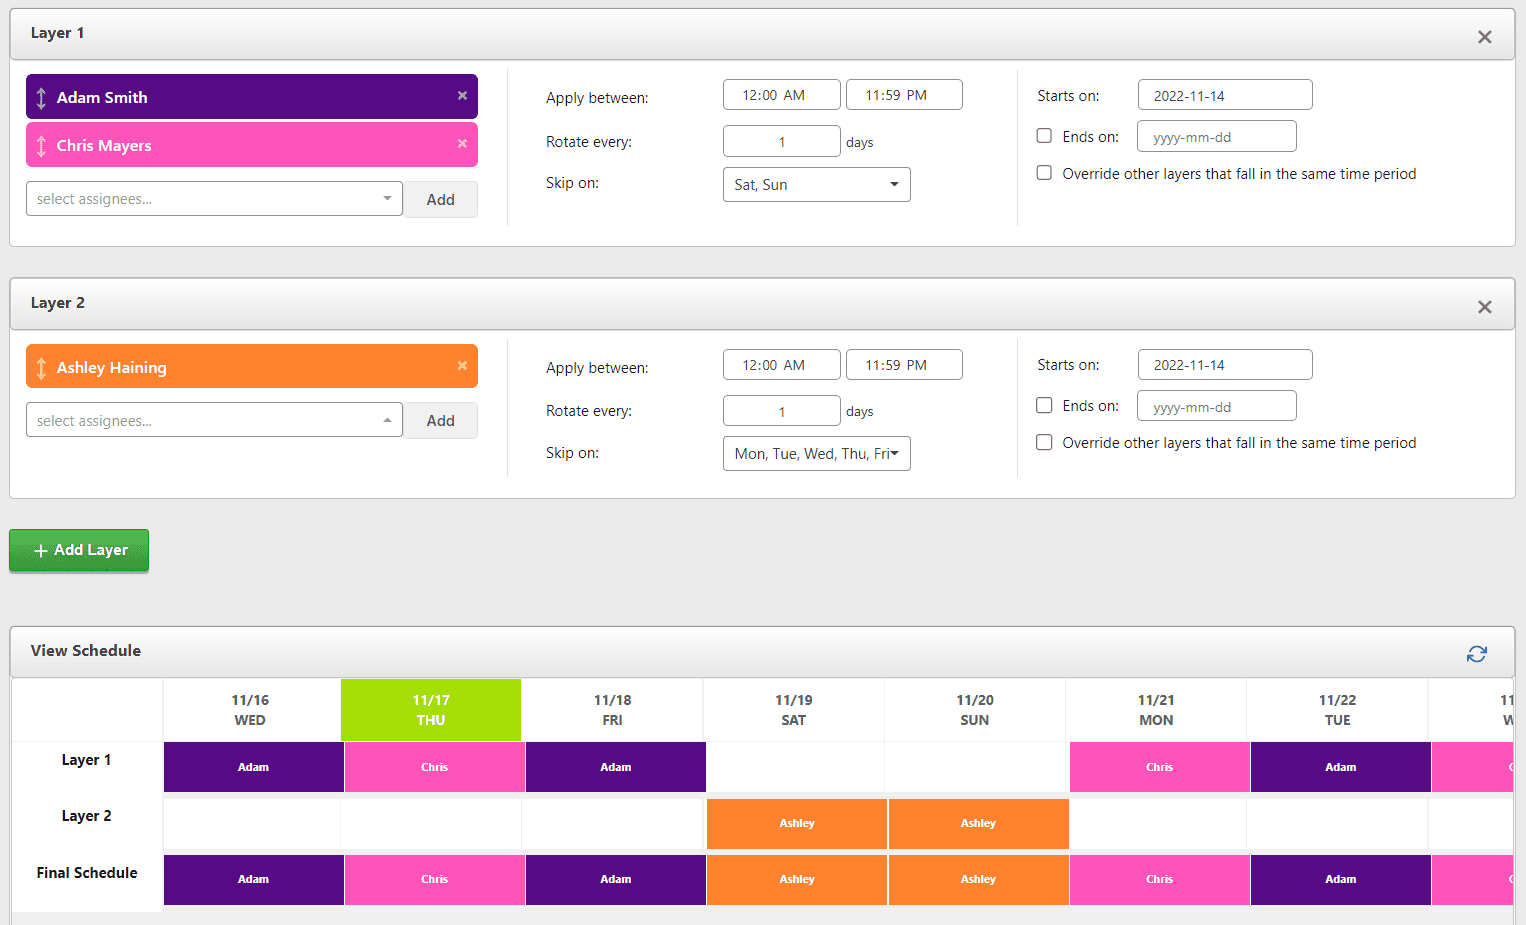
- Create a routine with 2 layers.
- Layer 1
- Add the first two people to this layer.
- Make the shift start at 09:00 AM.
- Set the duration to 24:00 hours.
- Rotate every 1 day.
- Set skip days to Saturday and Sunday.
- Set the start date as per your need.
- Layer 2
- Add the third person to this layer.
- Make the shift start at 09:00 AM.
- Set the duration to 24:00 hours.
- Rotate every 7 day.
- Set skip days to Monday, Tuesday, Wednesday, Thursday and Friday.
- The start date should be the same as Layer 1.
- Layer 1
Example 6: How to handle vacations
In this example we will show how you can adjust your schedule without having to set up a different routine. We will use the Ends on setting of routine layers to achieve this.
We will work with a 24 hour schedule that rotates every day between 2 people (Adam and Macy). Adam will be on vacation on Nov 18. He will return to work on Nov 21. During the time Adam will be on vacation, Macy will take over his shift as well while doing her own.
Solution
Handling vacations entails making changes to an existing routine. If you have followed through the other examples, then at this point you should know how to set up the regular 24 hour schedule between Adam and Macy that rotates every day. When you need to update it to handle the vacation, simply go to that routine and do the following:
- Add a new layer to the routine (in the snapshot below the new layer is Layer 2).
- Only add Macy as the assignee for this layer.
- Make the shift start at 12:00 AM.
- Set the duration to 24:00 hours.
- Rotate every 1 day.
- Set Starts on to Nov 18.
- Check the Ends on checkbox and set it to Nov 21.
- Check the Override other layers that fall in the same period checkbox.
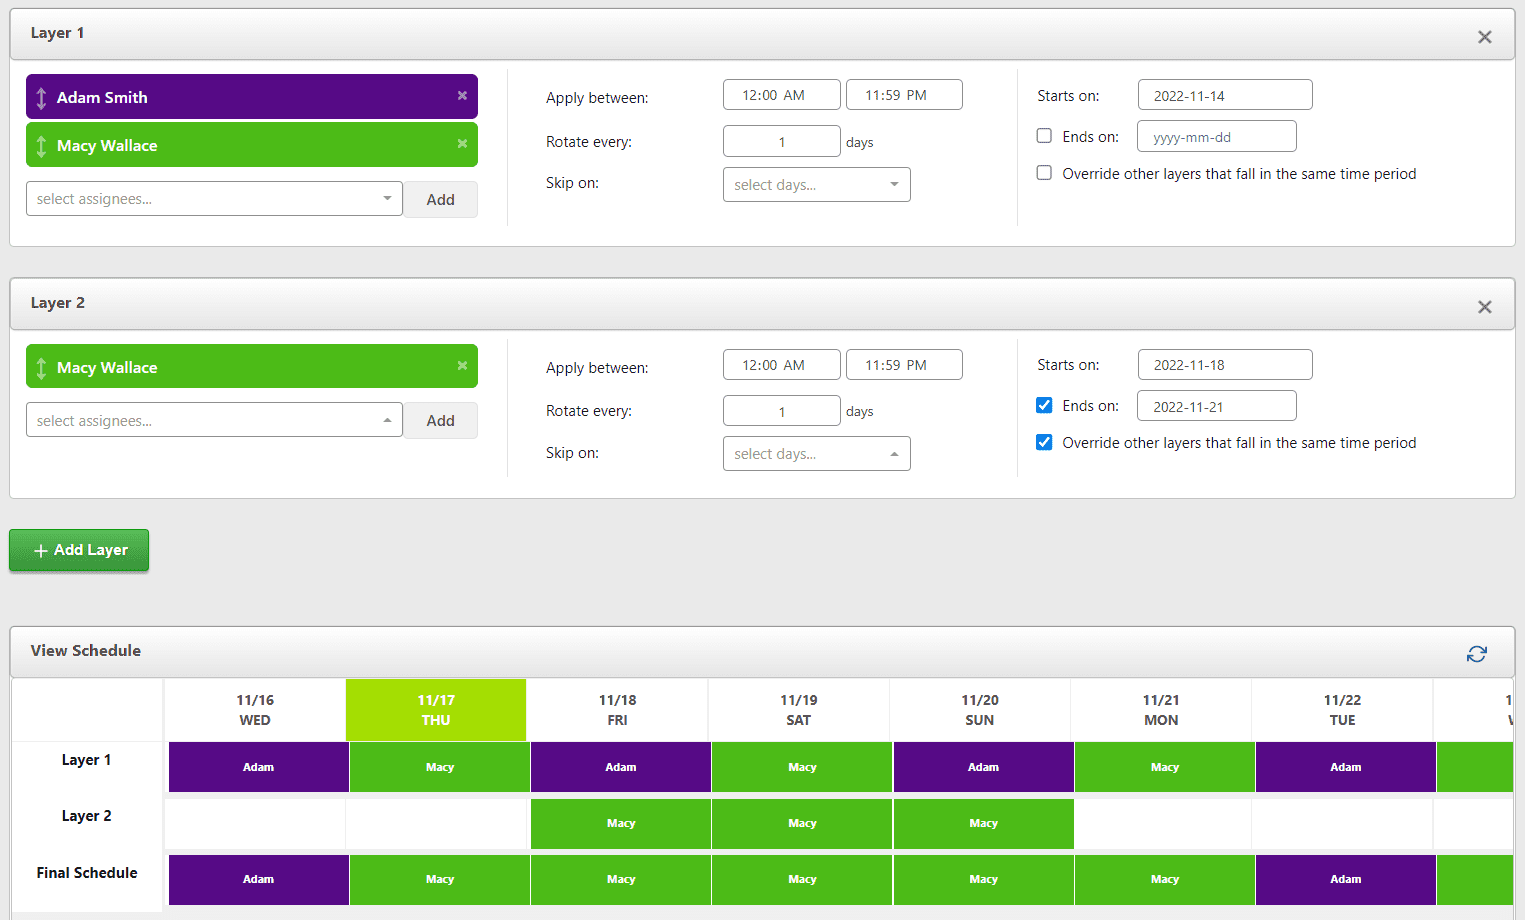
The additional layer you created can just stay on. You do not need to remove it. Since it is restricted to apply strictly between Nov 18 and Nov 21, it will not impact the rest of the routine. In the future, when Adam goes on vacation again and Macy has to take over for him, you can just come back to this layer and adjust the start and end dates.
Example 7: Schedule that switches in the middle of the week and day
In Example 7 we will look at how a Routine can be created to accommodate a schedule that changes on-call personnel in the middle of the week and the middle of the day. This will be the most intricate schedule out of all the examples here.
Let us assume that the team consists of 2 people – Chris Mayers and Adam Smith. On-call duty is split between the two in the following manner:
- Chris is on call during business hours – from 9 AM to 5 PM on weekdays (Monday through Friday).
- Adam is on call Tuesday night and Thursday night (nights will be counted from 5 PM until 9 AM the following day).
- Chris is on call Monday and Wednesday nights (again 5 PM to 9 AM the following day).
- Weekend on call is from 5 PM on Friday to 9 AM Monday, and it rotates between Chris and Adam each week.
Solution
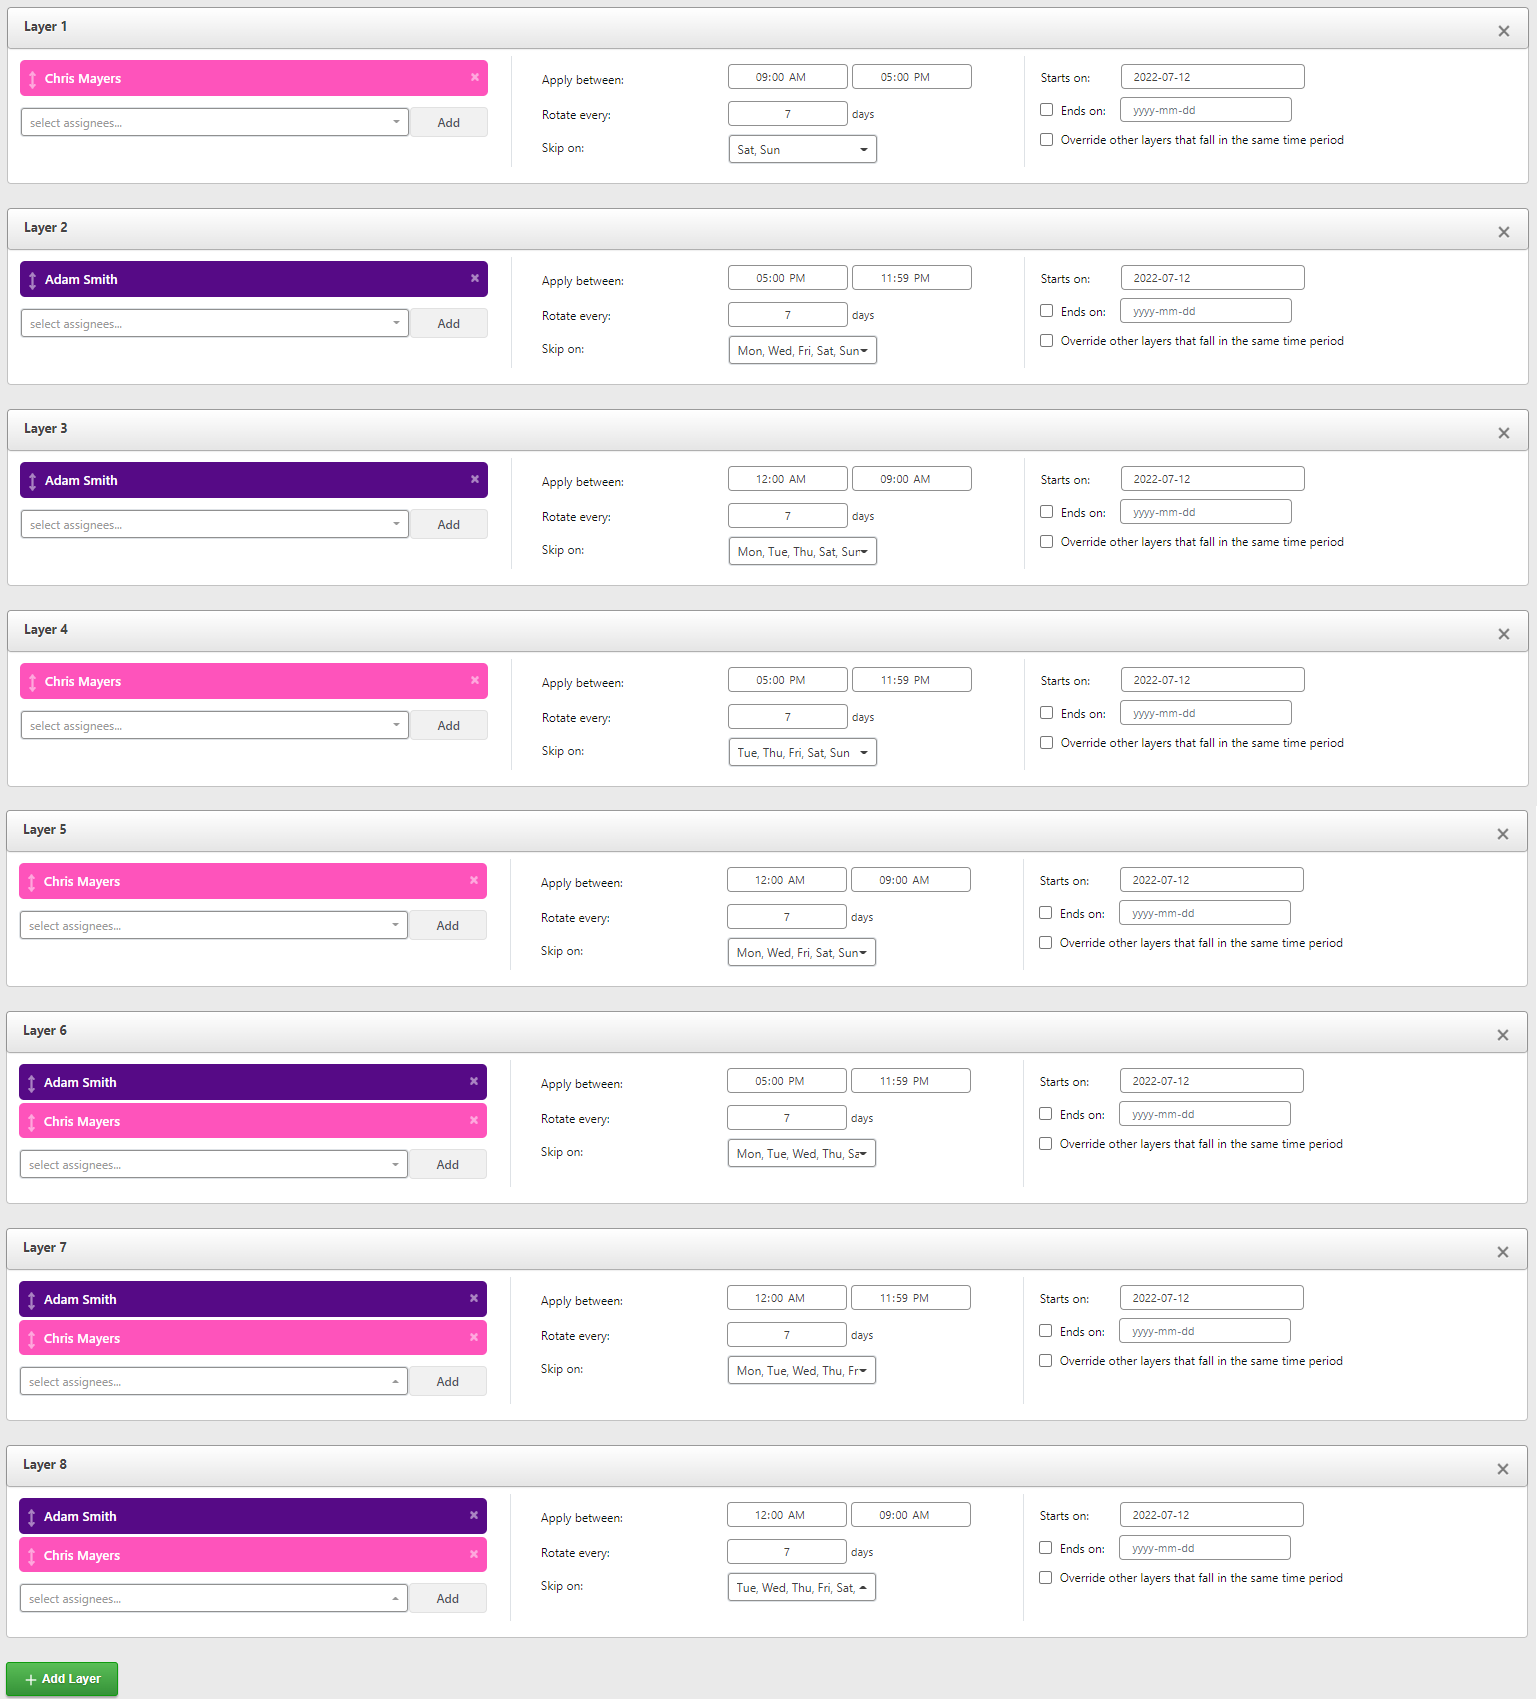
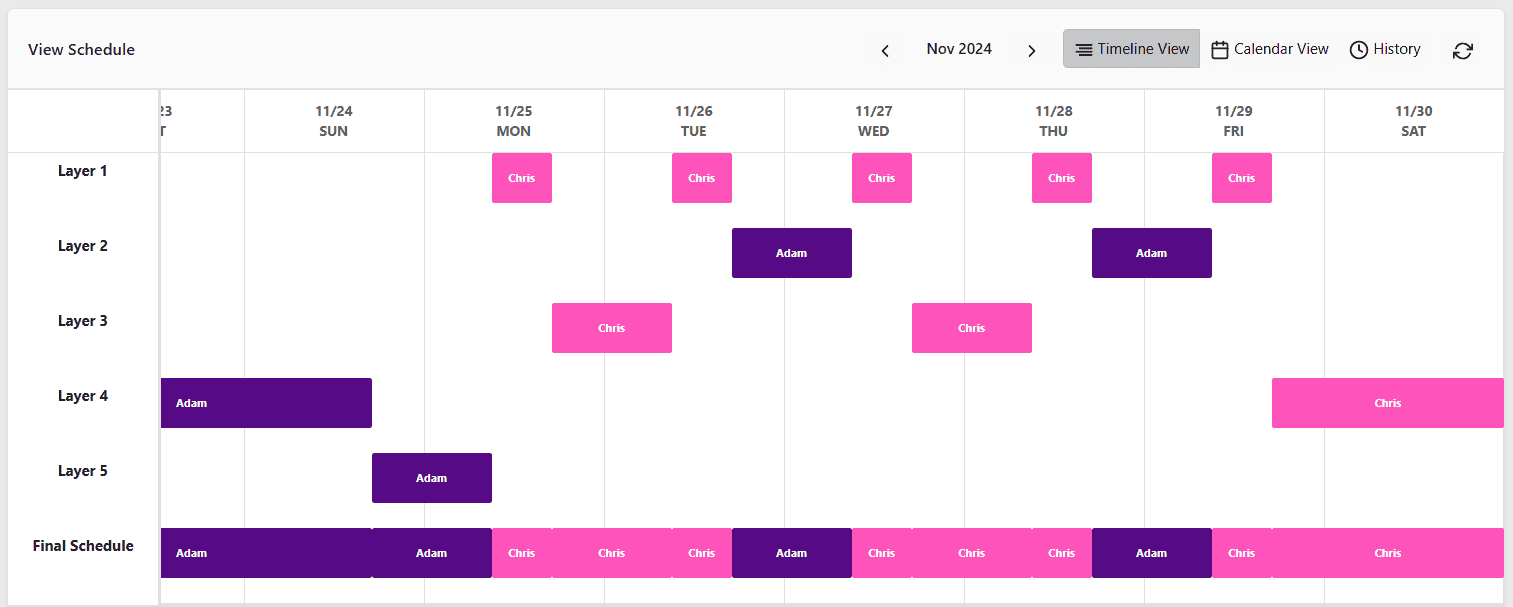
In order to set up this schedule we will need to create a routine with 5 layers. The layers need to be created as below.
| Assignees | Shift starts at | Duration | Skip on | Requirement fulfilled | |
| Layer 1 | Chris | 09:00 AM | 08:00 hours | Sat, Sun | Chris is on call during business hours - from 9 AM to 5 PM on weekdays (Monday through Friday) |
| Layer 2 | Adam | 05:00 PM | 16:00 hours | Mon, Wed, Fri, Sat, Sun | Adam is on call Tuesdays and Thursdays from 5 PM to 9 AM the following morning. |
| Layer 3 | Chris | 05:00 PM | 16:00 hours | Tue, Thu, Fri, Sat, Sun | Chris is on call Mondays and Wednesdays nights from 5 PM to 9 AM the following morning. |
| Layer 4 | Adam Chris | 05:00 PM | 24:00 hours | Mon, Tue, Wed, Thu, Sun | First part of the weekend schedule - 5 PM Friday to 5 PM Sunday. |
| Layer 5 | Adam Chris | 05:00 PM | 16:00 hours | Mon, Tue, Wed, Thu, Fri, Sat | Second part of the weekend schedule - 5 PM Sunday - 9 AM Monday. |
